
Rufus vs Etcher: Which Bootable USB Creator Is Best? (2026 Comparison)
Deciding between Rufus vs Etcher comes down to your OS and needs. Rufus is a fast, Windows-only tool for custom Windows 10/11 bootable USBs. balenaEtcher is a simple, cross-platform tool ideal for flashing Linux ISOs and SD cards.

By Ellie Updated July 22, 2026


Need to flash a Linux ISO, build a bootable Windows 11 drive, or burn an image to a Raspberry Pi SD card? You have likely narrowed your choices down to Rufus vs Etcher. Both tools dominate the media creation landscape, yet they approach the task from completely different angles.
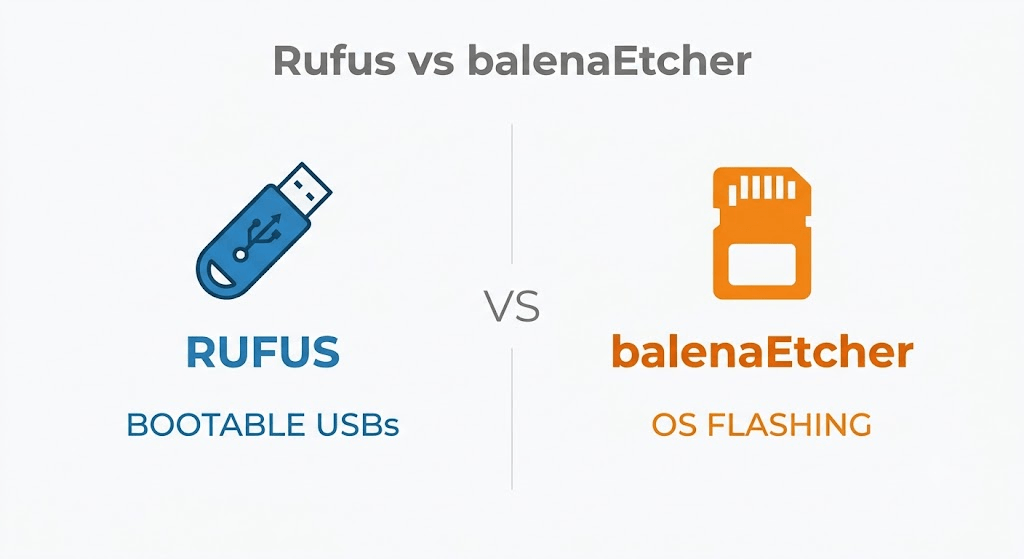
Choosing the wrong tool can lead to failed boot sequences, unreadable drives, or wasted time. In this comprehensive comparison of Rufus vs Etcher, we break down their performance, features, OS compatibility, and real-world reliability so you can pick the exact tool for your workflow.
Quick Verdict: Rufus vs Etcher at a Glance
If you are short on time, here is the direct answer:
- Choose Rufus if: You are on Windows, need to create Windows 10/11 bootable USBs, want to bypass Windows 11 hardware restrictions (TPM/Secure Boot), or need fine-grained control over partition schemes (MBR/GPT).
- Choose balenaEtcher if: You are on macOS or Linux, need a simple 3-step tool to burn Linux ISOs or Raspberry Pi SD cards, or prefer an effortless interface without complex technical settings.
Feature Comparison Matrix
|
Feature |
Rufus |
balenaEtcher |
|
Supported OS |
Windows only |
Windows, Mac, Linux |
|
Installer Size |
~1.5 MB (Portable) |
~140 MB–150 MB |
|
Flashing Speed |
Extremely fast (Direct raw write) |
Moderate (Includes mandatory validation step) |
|
Target Audience |
System admins, power users, Windows builders |
Beginners, Linux/Raspberry Pi users, Mac users |
|
Windows 11 Bypasses |
Yes (TPM 2.0, RAM, Microsoft Account) |
No |
|
Partition Scheme Options |
Full control (MBR / GPT / Target System) |
None (1:1 raw binary copy) |
|
Drive Safety Protection |
Basic warning prompts |
Advanced hard drive filter & auto-hide |
|
Direct ISO Download |
Yes (Windows 11, 10, 8.1) |
No (Requires local image or URL) |
What Are Rufus and balenaEtcher?
Creating a bootable USB drive requires writing an ISO or IMG file to a flash drive while setting up the proper boot sector (UEFI or Legacy BIOS). Both Rufus and balenaEtcher perform this core task, but they target different user bases and workflows.
What Is Rufus?
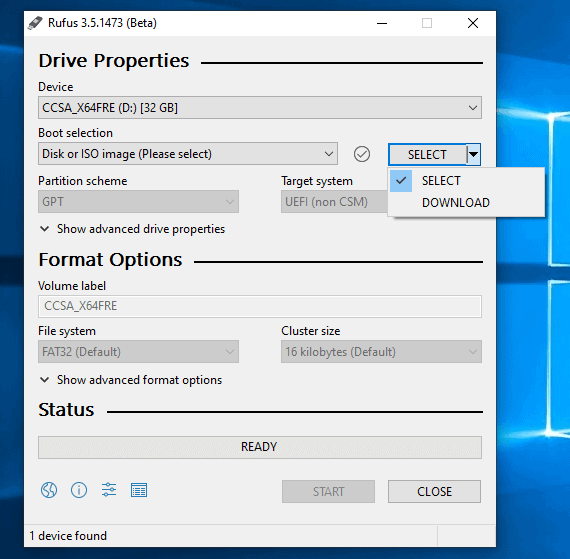
Rufus (Reliable USB Formatting Utility with Source) is an open-source Windows application created by Pete Batard. First released in 2011, Rufus was built as a modern replacement for the legacy HP USB Disk Storage Format Tool.
Written entirely in native C, Rufus interacts directly with Windows system APIs and hardware controllers. It allows users to format USB drives, build bootable media from ISOs, adjust partition schemes (MBR vs. GPT), and modify Windows installation parameters without third-party scripts.
What Is balenaEtcher?
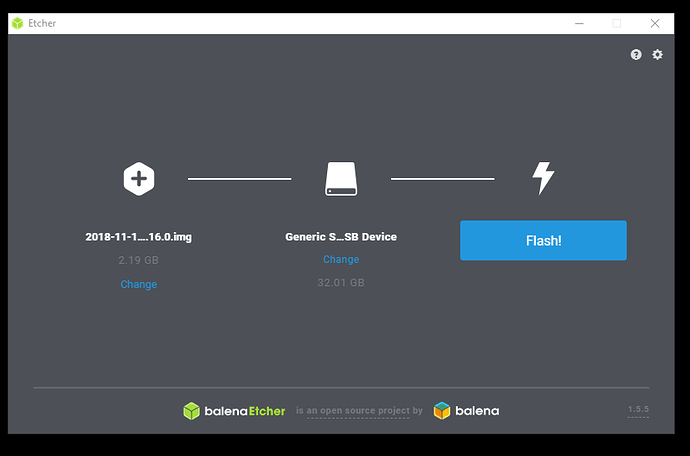
balenaEtcher (commonly known as Etcher) is an open-source image flashing utility developed by balena (formerly Resin.io). Released in 2016, Etcher was designed to eliminate the high failure rate of manual disk writing commands like "dd" on Linux and macOS.
Built on the Electron framework using HTML, JavaScript, and Node.js, balenaEtcher provides a uniform interface across desktop platforms. It focuses on a streamlined 3-step process: Select image > Select target drive > Flash.
Deep Feature Breakdown: balenaEtcher vs Rufus
While both utilities write raw disk images, comparing balenaEtcher vs Rufus reveals major architectural and operational differences.
1. Platform Support & Portability
Platform compatibility is the primary deciding factor:
- Rufus: Runs exclusively on Windows (Windows 8 through Windows 11). It does not offer native macOS or Linux builds.
- balenaEtcher: Runs natively on Windows, macOS, and Linux distributions (via AppImage, DEB, or RPM).
When evaluating Rufus vs balenaEtcher on macOS or Linux, Etcher wins by default because Rufus cannot run natively on non-Windows systems.
2. Performance, Speed, and Resource Efficiency
In side-by-side speed tests when analyzing Etcher vs Rufus, Rufus consistently outpaces Etcher during large ISO writes.
- Rufus: Because it is compiled in C without heavy UI frameworks, Rufus starts instantly and consumes under 20 MB of RAM. When writing a standard 5 GB Windows 11 ISO to a USB 3.0 drive, Rufus completes the task significantly faster by making direct raw calls to the storage driver.
- balenaEtcher: Running on Electron means Etcher loads a headless Chromium browser instance in the background. The app requires over 100 MB of disk space and up to 300 MB of RAM during execution. Its built-in verification step also doubles total processing time unless manually disabled.
3. Advanced Customization & Windows 11 Bypasses
When analyzing Rufus vs balenaEtcher for modern operating system setups:
- Rufus is a power user's toolbox. Rufus gives you control over the partition scheme (MBR for legacy BIOS vs. GPT for UEFI), target system types, cluster sizes, and file systems. More importantly, when flashing a Windows 11 ISO, Rufus offers an automated prompt to bypass TPM 2.0, Secure Boot, minimum RAM requirements, and forced Microsoft Account creation.
- Etcher is a raw bit-writer. Etcher does not alter the structure of the incoming image file. It performs a 1:1 sector write of raw .iso, .img, .zip, or .gz files. If an ISO requires specific MBR/GPT table modifications, Etcher cannot perform those adjustments.
4. Safety, Telemetry, and Drive Protection
Both tools implement measures to prevent users from wiping internal system drives:
- Drive Isolation: Rufus hides internal hard drives and SSDs from its target device list by default. Users must manually enable an advanced option to show fixed disks.
- Flash Validation: balenaEtcher automatically validates every written block against the source image file after flashing. This prevents booting from corrupted SD cards or faulty USB drives.
- Privacy & Telemetry: Etcher includes opt-out telemetry and historically displayed promotional ads (featured projects) inside the UI during flashing. Rufus includes zero ads and only connects to the internet to check for software updates if permitted.
Advantages and Disadvantages: Rufus vs. balenaEtcher
To help you weigh your options at a glance, evaluating the core strengths and limitations of both tools offers a quick reality check before you make a choice. Here is a breakdown of the pros and cons for Rufus and balenaEtcher:
Rufus
Pros:
- Ultra-fast flashing speed with low RAM usage.
- No installation needed (standalone executable under 2 MB).
- Built-in tools to bypass Windows 11 hardware and account requirements.
- Full control over MBR, GPT, file systems, and cluster sizes.
- Supports Windows To Go drive creation.
Cons
- Works only on Windows systems.
- The dense interface can intimidate beginner users.
balenaEtcher
Pros:
- Cross-platform compatibility (Windows, macOS, and Linux).
- Clean, modern 3-step user interface.
- Automatic post-write validation ensures image integrity.
- Excellent for flashing Raspberry Pi OS and micro-SD cards.
Cons
- Large file size (>100 MB) and higher resource usage due to Electron.
- Slower overall write process due to default validation.
- No support for partition schemes, file system selection, or Windows 11 tweaks.
Step-by-Step Guide: How to Create a Bootable USB
Creating a bootable flash drive is a straightforward process, but the exact steps depend on which software you prefer. Whether you choose the feature-packed precision of Rufus or the minimalist simplicity of balenaEtcher, follow the step-by-step instructions below to write your ISO or disk image safely.
Option 1: How to Burn an ISO Using Rufus (Windows)
If you are running Windows and need granular control over partition schemes or want to bypass Windows 11 system requirements, Rufus is the ideal tool. Follow these steps to prepare your bootable drive:
1. Insert your USB drive: Plug a USB flash drive (8 GB or larger recommended) into your Windows PC.
2. Launch Rufus: Download the latest version of Rufus from the official website and open the portable ".exe" file (no installation required).
3. Select target device: Choose your flash drive from the Device drop-down menu.
4. Load the ISO file: Click SELECT next to Boot selection, choose your target ".iso" file, and click Open.
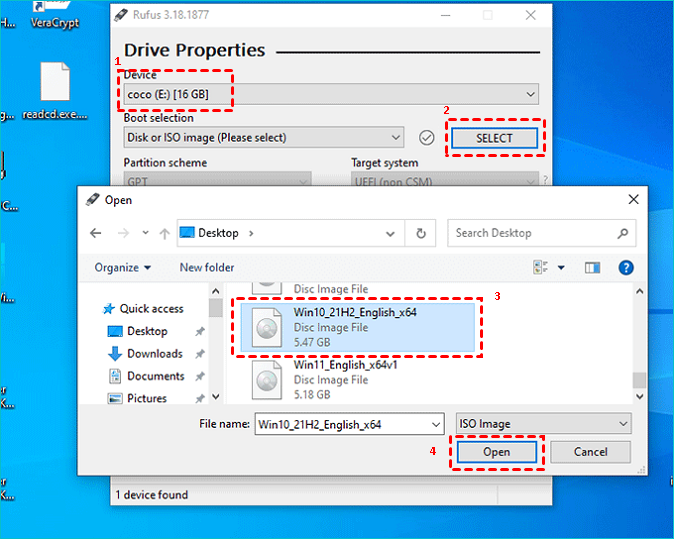
5. Set the Partition scheme:
- Select GPT for modern UEFI-based systems.
- Select MBR for legacy BIOS or older hardware setup.
6. Configure settings & Start: Customize the Volume label if desired, then click START.
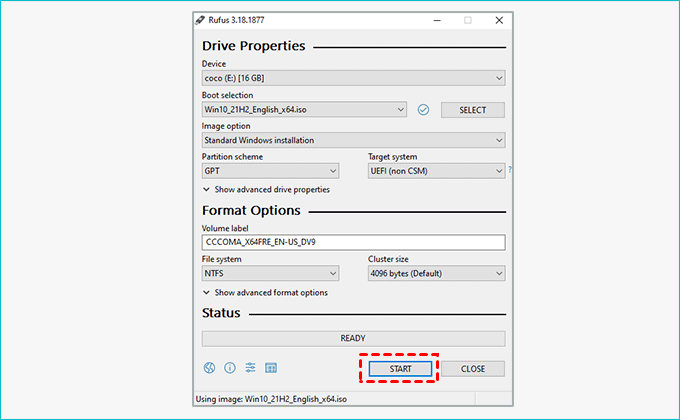
7. Apply Windows 11 tweaks (If applicable): If you are flashing a Windows 11 ISO, customize the installation options in the pop-up dialog box (e.g., bypass TPM 2.0, Secure Boot, or online account requirements).
8. Confirm and flash: Click OK on the data destruction warning prompt to begin the flashing process.
Option 2: How to Flash an Image Using balenaEtcher (Cross-Platform)
If you are using macOS or Linux, or simply prefer a streamlined, 3-step process on Windows, balenaEtcher provides a foolproof flashing experience. Here is how to use it:
1. Connect your storage drive: Plug your USB flash drive or SD card into your computer.
2. Launch balenaEtcher: Download and open balenaEtcher for Windows, macOS, or Linux.
3. Select source image: Click Flash from file and select your ".iso", ".img", or compressed ".zip" archive.
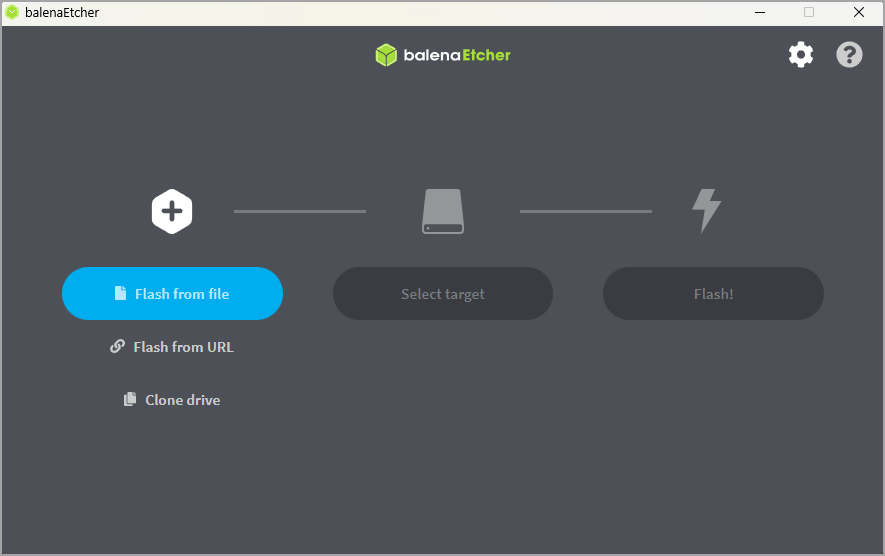
4. Choose target drive: Click Select target and check the box next to your connected storage device.
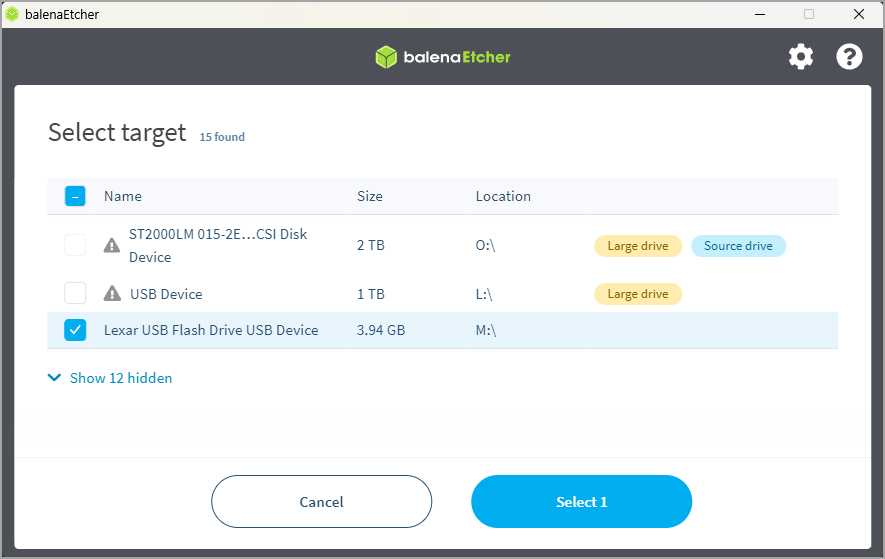
5. Start flashing: Click Flash! to initiate the writing process.
6. Authenticate: Enter your administrator (macOS/Windows) or root password if prompted by your operating system.
7. Validate and finish: Wait for both the writing and automatic post-write validation stages to complete before safely removing your drive.
Here is an enriched, SEO-optimized version of that section. It includes a complete title, smooth transitional introductory text, deeper technical explanations for each scenario, an additional practical use case (Windows To Go), and a quick-reference decision table to make the content far more comprehensive for readers and search engines alike.
Which Tool Should You Choose? Real-World Decision Scenarios
To help you make the right choice immediately, here is how both flasher tools (and one notable alternative) perform across four common real-world scenarios:
Scenario 1: Installing Windows 10 or Windows 11 on a PC
Clear Winner: Rufus
Why It Wins: Modern Windows ISO files frequently exceed 4 GB, which causes problems for FAT32 file systems. Rufus solves this natively by creating custom UEFI NTFS bootable drives. Furthermore, Rufus is the only tool that includes built-in automated scripts to customize the Windows setup environment.
Key Advantages:
- Bypasses strict Windows 11 hardware requirements (TPM 2.0, Secure Boot, minimum 8 GB RAM).
- Skips mandatory Microsoft account sign-ins, allowing you to create a local offline user account directly.
- Automatically disables privacy telemetry and data collection questions during setup.
Why Etcher Fails Here:balenaEtcher often creates unbootable USBs for modern Windows installers because it performs a direct block copy rather than setting up necessary UEFI NTFS bootloaders or splitting oversized "install.wim" files.
Scenario 2: Flashing Raspberry Pi OS, Batocera, or Linux Distros on Mac or Linux
Clear Winner: balenaEtcher
Why It Wins: If you run macOS or Linux, Rufus is completely out of the equation since it only operates on Windows. Etcher excels in single-board computer (SBC) workflows and retro gaming setups (like Batocera or Recalbox).
Key Advantages:
- Direct Archive Flashing: Accepts compressed raw disk images (".img.xz", ".zip", ".gz") directly without requiring manual extraction using 7-Zip or WinRAR first.
- SD Card Protection: MicroSD cards used in Raspberry Pis are notoriously prone to silent write failures. Etcher’s automatic post-write verification checks every data block against the source image to ensure your system boots reliably.
- Cross-Platform Parity: Offers the same 3-step interface whether you are running macOS, Ubuntu, or Windows.
Scenario 3: Creating a Portable "Windows To Go" USB Drive
Clear Winner: Rufus
Why It Wins: If you need to run a fully functional, self-contained Windows desktop directly from a high-speed external SSD or USB flash drive on any host computer, Rufus makes this setup seamless.
Key Advantages:
- Includes a dedicated Windows To Go toggle when loading a standard Windows ISO.
- Configures the external drive to run Windows independently without touching or altering the internal storage of the host PC.
Critical Pre-Flashing Step: Protect Your Data with CBackup
Before you click "Start" in Rufus or "Flash!" in Etcher, there is one non-negotiable rule every tech user should follow: low-level disk formatting leaves zero room for misclicks.
Flashing a bootable USB overwrites every single sector on the target storage device. Because these tools communicate directly with drive controllers, completely bypassing the Windows Recycle Bin, selecting the wrong drive letter will result in instant, permanent data loss. A single misidentified external hard drive could erase years of personal photos, client work, or critical system files in seconds.
The Ultimate Fail-Safe: Why Use CBackup Before Flashing?
To eliminate the risk of catastrophic drive wipes, creating an off-site backup before running any formatting utility is essential. CBackup serves as your zero-cost safety backup software, protecting your PC data before you perform high-risk disk operations.
Here is why it is the smartest pre-flashing companion:
- 100% Free Data Insurance: Back up your local files, desktop folders, and partition data directly to secure cloud storage without spending a dime or entering a credit card.
- Combine Free Cloud Storage: Connect your existing Google Drive, OneDrive, and Dropbox accounts into one unified interface, merging their separate free storage quotas into a massive cloud backup pool.
- Automated "Set-and-Forget" Sync: Schedule automatic backups to run effortlessly before you attempt system maintenance, disk repartitioning, or bootable USB creation.
- Zero-Bandwidth Cloud Migration: Seamlessly move or mirror files between different cloud services directly online, without slowing down your home internet connection.
Marketing Pro-Tip: Taking just 60 seconds to secure your files with CBackup guarantees complete peace of mind. Even if a drive letter mix-up happens during the flashing process, your critical documents remain completely untouched and recoverable in the cloud. Backup first, flash second.
Conclusion
When deciding between Rufus vs Etcher, the right tool depends entirely on your operating system, target storage media, and technical requirements:
- Choose Rufus if: You are on a Windows PC, need maximum write speed, want full control over partition schemes (MBR vs. GPT), or need to bypass Windows 11 hardware restrictions (TPM 2.0, Secure Boot, online account requirements).
- Choose balenaEtcher if: You are working on macOS or Linux, prefer an intuitive 3-step interface, or need a foolproof way to flash Raspberry Pi OS and Linux disk images onto SD cards.
No matter which utility wins in the Rufus vs Etcher comparison for your specific workflow, low-level disk flashing leaves zero room for error and completely wipes the target drive. To prevent catastrophic data loss caused by selecting the wrong drive letter, take 60 seconds to secure your critical files with CBackup before you flash. Backup first, flash second.
FAQs
Is Rufus better than Etcher for Windows 11 installation?
Can I run Rufus on Mac or Linux?
Why is BalenaEtcher's file size so much larger than Rufus?
How do I fix a "Disk is Write Protected" error in Rufus or Etcher?
Which tool is safer for beginners?
Can BalenaEtcher create multiboot USB drives?
Free Get CBackup Now

Secure & Free