
[8 Ways ] How to Find a Missing Drive on Windows 11/10
Losing a drive on Windows 11 or 10 can be stressful, especially when you need important files. If you’re wondering how to find a missing drive, you’re in the right place. This post covers 8 simple and effective methods to help you quickly locate and restore your missing drive on Windows.
by CBACKUP Lasted Updated June 26, 2026
My local disk D is missing in Windows 10
Hi all, I've got a problem with drive D. I was using my laptop yesterday, and everything was OK, and after turning it on today, I am missing drive D. The point is that I didn't do anything before I shut down yesterday. I was really surprised that it had just disappeared. Does anybody have any tips?
- Question from tenforums.com
Why the Drive Is Missing on Windows 11/10
Many users notice their drive goes missing after certain events. For example, after a Windows update, system changes can hide or unassign drive letters. It’s also common when installing new software, resizing partitions, or connecting external drives incorrectly.
The D drive is especially prone to disappearing because it’s often the default partition for data or secondary storage, making it more vulnerable to letter conflicts, like when a CD/DVD drive or USB device takes its letter, or accidental formatting during system tweaks. There are the most common causes that may cause your problem.
Here are the most common causes of your problem:
| 🔎 Cause | 📝 Explanation |
| Drive Letter Conflict | The CD/DVD drive uses the same letter as the D drive, causing a conflict that hides the original D drive. |
| Windows Update Changes | System settings or partition configurations change after an update, leading to the D drive disappearing. |
| Accidental Deletion/Formatting | The D drive may be accidentally deleted or formatted during partition resizing or reformatting operations. |
| Hidden Drive | The D drive may be hidden by the system, making it invisible in File Explorer. |
| Outdated or Corrupted Drivers | Storage or disk drivers that are outdated or corrupted can prevent the system from detecting the D drive. |
| Drive Letter Conflict | Two drives assigned the same letter cause one to disappear. |
Being aware of these situations can help you act quickly to restore your missing drive.
How to Find a Missing Drive in 8 Ways
If your hard drive disappeared from Windows 11/10, don’t worry — there are several effective ways to find and restore it. Whether it’s caused by drive letter conflicts, hidden partitions, or driver issues, the following 8 methods will help you quickly locate your missing drive and get your data back accessible.
Method 1. Rescan Disks in Disk Management
You can rescan disks in Disk Management when a hard drive disappears after updates, driver changes, or connecting new devices. This forces Windows to detect any connected but unrecognized drives. It won't restore deleted or corrupted drives — it only works if the drive remains intact and properly connected.
Check that cables are secure and the drive has power before you run the rescan. This is a quick, low-risk step and a good first action when a drive goes missing.
Follow these steps to fix the drive missing issue:
Step 1. Please click This PC on your desktop, and then right-click it, and select the Manage option.
Step 2. It will open the Computer Management window, now, click Action > Rescan Disks.

After scanning, see whether the local Disk D is missing or not.
Method 2. Assign or Change Drive Letter
Changing or assigning a drive letter can really come in handy when a drive is connected but doesn’t show up in File Explorer. This situation often arises if the drive hasn’t been assigned a letter or if its letter clashes with another device. It’s particularly common after system updates, when new drives are installed, or when you reconnect external drives.
But there is one thing you need to pay attention to: be cautious not to assign a letter that’s already in use by another device. Also, steer clear of changing the drive letters for system or application drives, as this could lead to apps acting up. Always take a moment to double-check the drive before making any changes!
Steps to assign or change the drive letter to fix the hard disk disappeared problem:
Step 1. Right-click the Start menu and select Disk Management.
Step 2. Find the missing drive from the list of volumes.
Step 3. Right-click it and choose Change Drive Letter and Paths.
Step 4. Click Add (if no letter is assigned) or Change to assign a new letter.
Step 5. Select a unique letter and click OK.
After completing these steps, your drive should reappear in File Explorer.
Method 3. Update Drive Drivers
Outdated or corrupted drivers can cause your system to fail to recognize the connected drive properly. When Windows cannot communicate correctly with the hardware, the drive may not appear in File Explorer, leading to problems like the D drive missing. Updating drivers restores proper communication between the system and the drive.
How to fix a hard drive not showing up on Windows by updating its drivers:
Step 1. Please go to This PC > Manage > System Tools > Device Manager > Disk Drives.
Step 2. Expand Disk drives, right-click the hard disk, and choose the Update driver option.
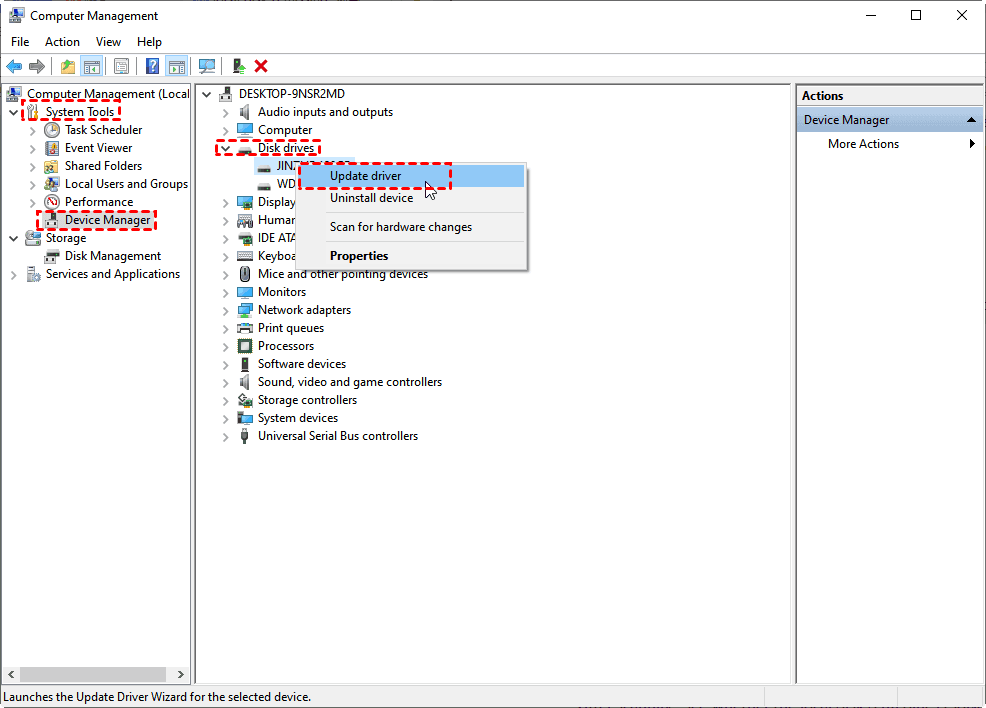
Step 3. It will update the driver automatically. Now, check if my local D drive is still missing.
Method 4. Perform a System Restore
If you've set up restore points on your Windows computer, sometimes you might be able to resolve the issue of the D drive missing by restoring your system. If the issue started after a Windows update, driver change, or system setting adjustment, using System Restore can help bring back the missing driver.
This method is effective for software-related problems, such as corrupted system files or registry errors. However, it won’t fix hardware issues like a disconnected or damaged drive, or a deleted partition. Before restoring, check Disk Management—if the drive appears there without a letter or as unallocated, you may be able to fix it by assigning a drive letter or creating a new volume.
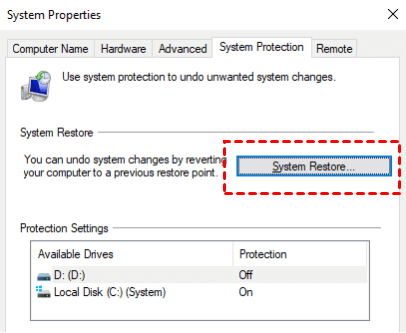
Step 1. Search for "System Restore" in the Start menu, and select "Create a system restore" to open it.
Step 2. Click on System Restore on the System Protection page.
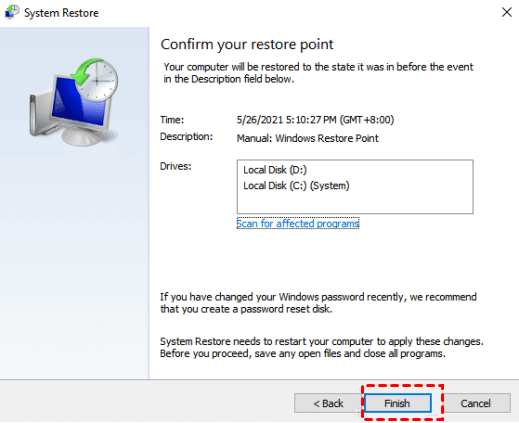
Step 3. Choose the targeted restore point and follow the on-screen guide to restore Windows 11/10 to an earlier date so that the D drive is now detectable.
Method 5. Format the Drive to NTFS
When disk D is missing, another possible fix is to format the drive to NTFS, especially in some specific situations. If you see the drive listed in Disk Management as “RAW,” “Unallocated,” or lacking a file system, reformatting it to NTFS can help restore access and assign a drive letter. This approach is particularly effective when file system errors are preventing the drive from being read.
Just keep in mind that formatting will wipe all data from the drive. If your system doesn’t recognize the drive at all, it’s likely a hardware issue. Always remember to back up any important files before you proceed with a format.
Here’s a simple 4-step guide to fix the Disk D is missing issue by formatting the drive to NTFS:
Step 1. Open Disk Management ('Win + X' > Disk Management).
Step 2. Find the missing drive (it may show as RAW or Unallocated).
Step 3. Right-click the drive and select Format, then choose NTFS as the file system and confirm.
Step 4. If needed, right-click again, select Change Drive Letter and Paths, and assign the letter D.
📝 Note: Formatting will erase all data on the drive, so back up important files first.
Method 6. Check Local Disk D in Safe Mode
If your local Disk D doesn’t appear in the BIOS, it may indicate a deeper issue with the drive or its connection. In this situation, booting into Safe Mode can help troubleshoot the problem.
Safe Mode is a special startup option for Windows that loads only the essential drivers and services. This can help you avoid issues caused by third-party software or problematic drivers that might be hiding or disabling your drive. By booting into Safe Mode and checking Drive D, you can figure out if the issue is related to software, allowing you to take the necessary steps to regain access to your missing drive.
Follow the steps to check the Disk D:
Step 1. Restart your computer and repeatedly click the F8 key while booting, and choose the Enable Safe Mode with Networking option.
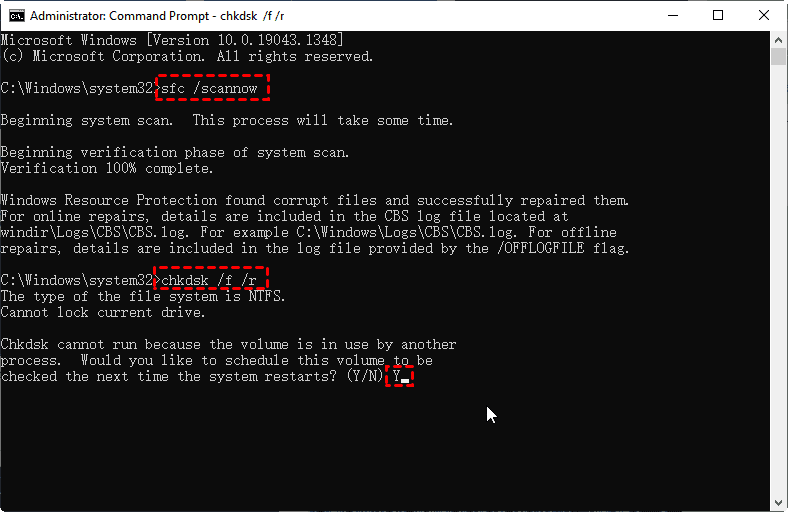
Step 2. Then run the command prompt as an administrator.
Step 3. Execute the command lines one by one:
sfc /scannow
chkdsk /f /r
Method 7. Run Built-in Troubleshooters
As mentioned in the previous method, Safe Mode helps identify whether software conflicts or driver issues cause Disk D to go missing. Building on that, you can run Windows’ built-in troubleshooters to automatically detect and fix common problems related to hardware, drivers, or system settings.
These troubleshooters are easy to use and can quickly resolve issues that prevent your drive from appearing in File Explorer. Running the built-in troubleshooters is a practical next step after checking your drive in Safe Mode to further diagnose and repair the problem of Disk D missing.
These steps will help you find the D drive disappeared:
Step 1. Open Settings and go to "Update & Security" > "Troubleshoot".
Step 2. Find and run the Hardware and Devices troubleshooter or Windows Store Apps troubleshooter (depending on your Windows version).
Step 3. Follow the on-screen instructions to detect and fix issues affecting your drives.
Method 8. Unhide Drives on Windows
If Drive D disappeared from File Explorer but appears in Disk Management, it may be hidden due to system settings. This can happen after Windows updates or permission changes. To fix it, check if the drive has a letter assigned. If not, assign or change the drive letter to make it visible again.
Also, review Group Policy or Registry settings that may block drives from appearing. This method helps restore access when disk D is hidden but still recognized by the system.
Here is what to do when you can't find the disc:
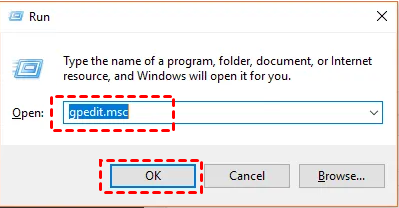
Step 1. Open the Run dialogue by pressing Windows key + R, then type gpedit.msc to access Local Group Policy Editor.
Step 2. Head to Computer Configuration > Administrative Templates > Windows Components. Double-click on File Explorer in the right window.
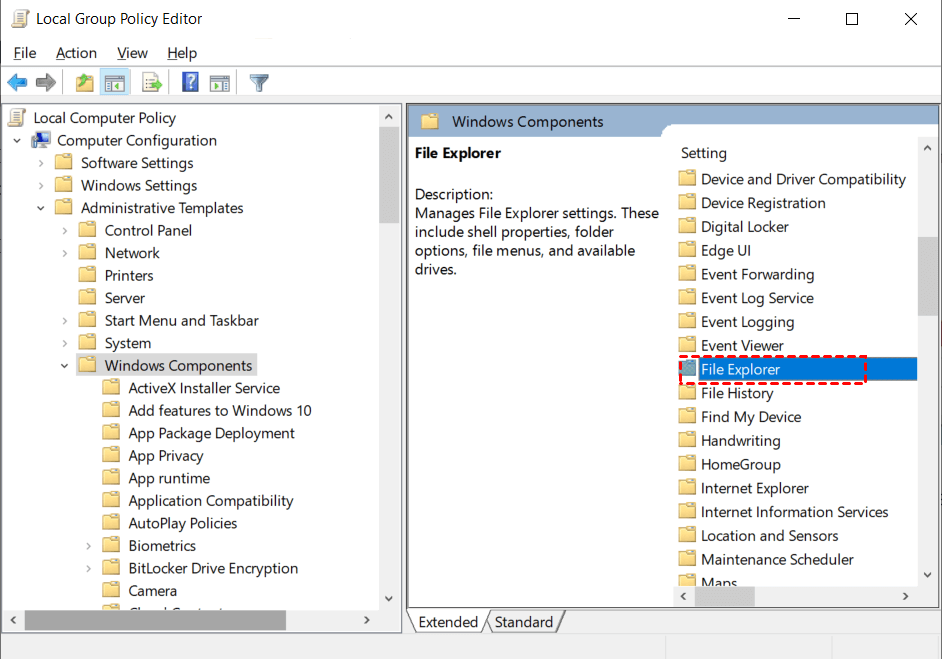
Step 3. Locate the Hide these specified drives in the My Computer option, right-click on it, and choose Edit.
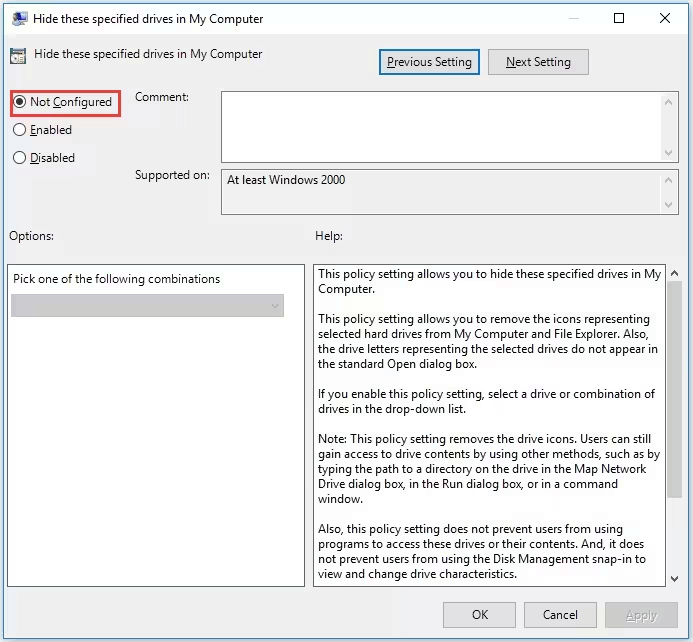
Step 4. Make sure the Not Configured option is checked. Then, click Apply and OK to confirm the change.
Bonus Tip: How to Prevent Local Disk D Missing
After trying the above solutions, you’re probably able to fix it now. After fixing it. It’s highly recommended to try the free cloud backup service and the best backup software for external hard drive - CBackup to backup or sync your hard drive's critical data to Google Drive, OneDrive, Dropbox, etc. And it prevents you from losing data on the local hard drive due to unexpected things, like system crashes, disk failures, etc.
Besides, CBackup provides you with powerful features while backing up:
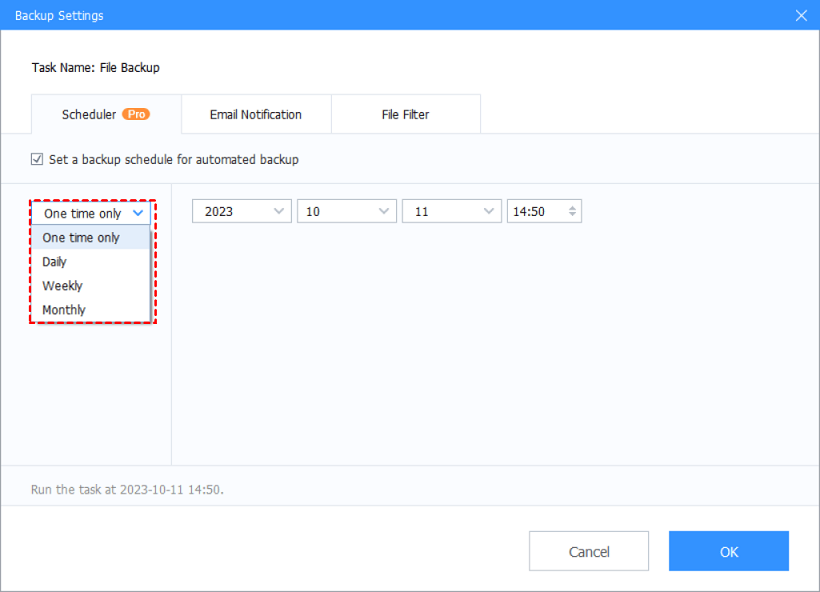
- Backup hard drive to cloud automatically with Scheduler, you could set up backup files daily, weekly, monthly, or at a specific time, saving you time and repeated operations.
- You could enable email notification with Email Notification to send you an email about the backup information, like the backup result.
- It allows you to backup file types as you like with File Filter, includes or excludes the file types, and even backs up all the file types accordingly.
Now, please follow the detailed steps to backup the local hard disk, including the D drive, to Google Drive, for example:
Step 1. Please download the CBackup disk backup software, and then sign up for a new CBackup account, and log in.
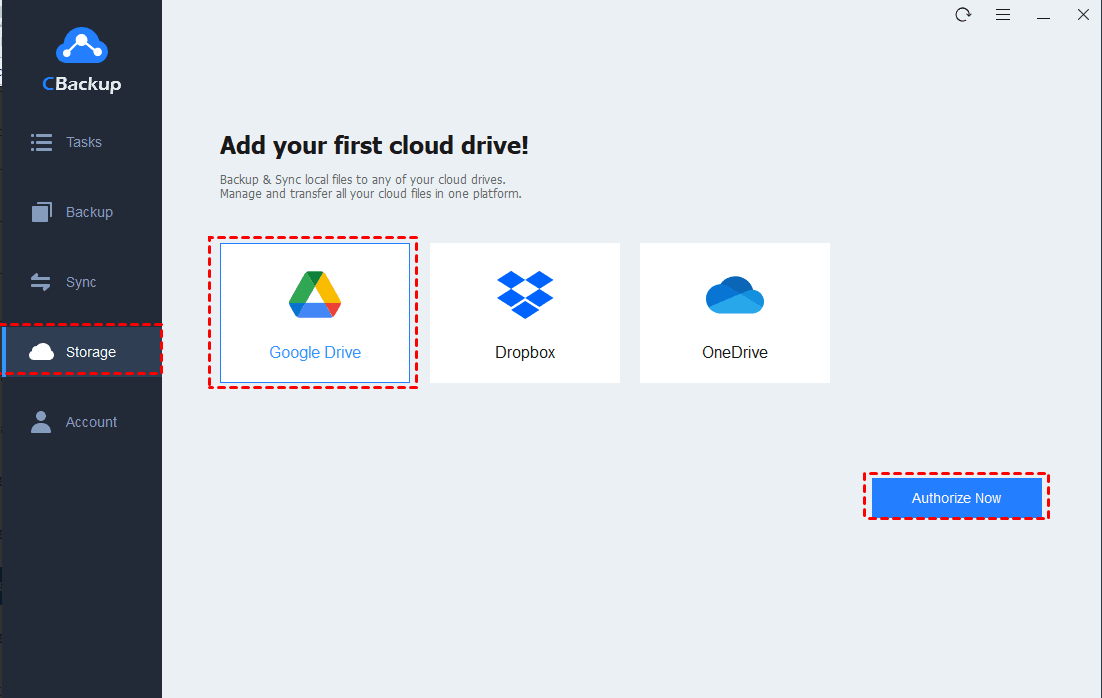
Step 2. Select the Storage tab, select Google Drive, and click Authorize Now. Then, grant CBackup access to Google Drive. Back to the CBackup window, and complete the Google Drive information.
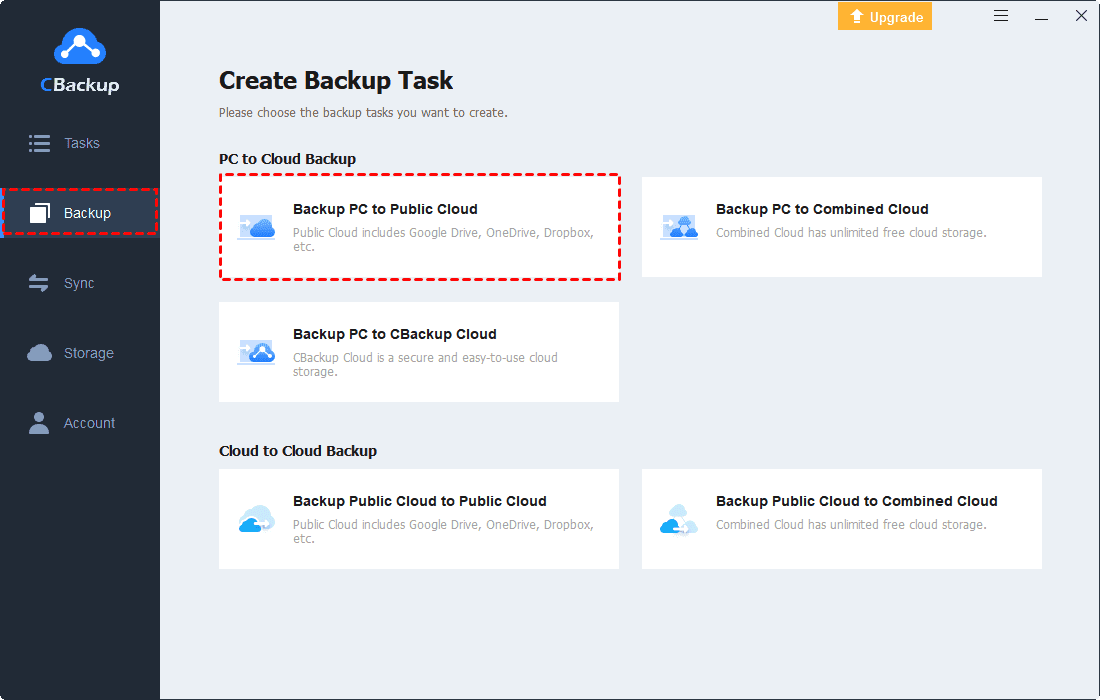
Step 3. Tap the Backup > Backup PC to Public Cloud.
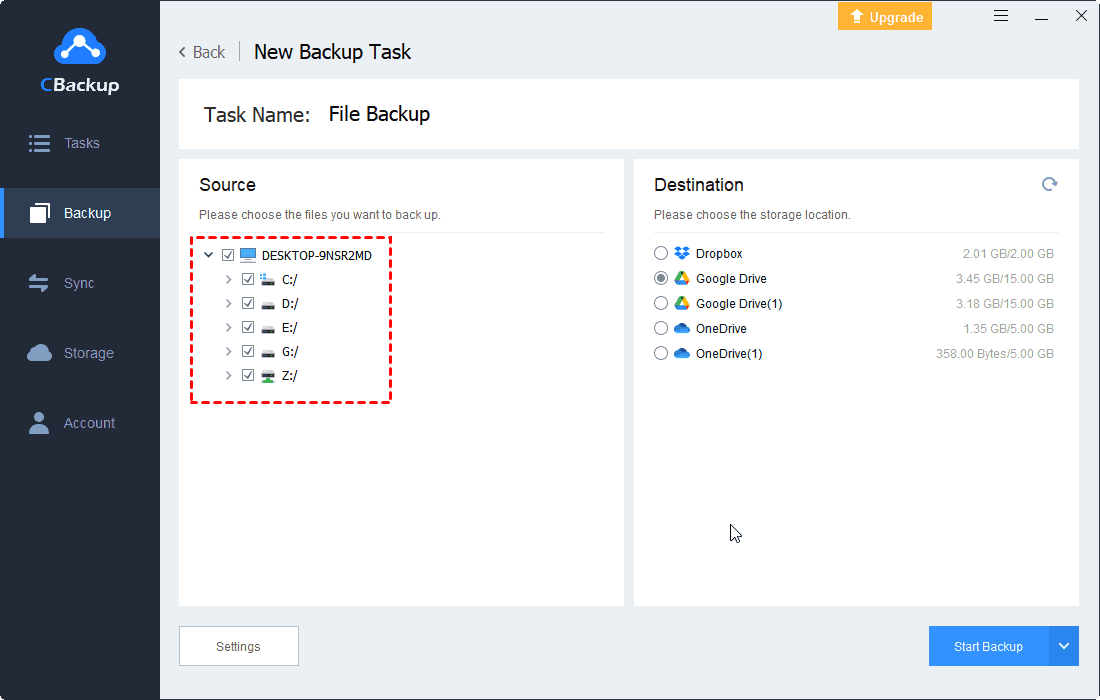
Step 4. Customize the Task Name to differ from others, choose local hard disk data for backup, and select Google Drive as the backup destination.
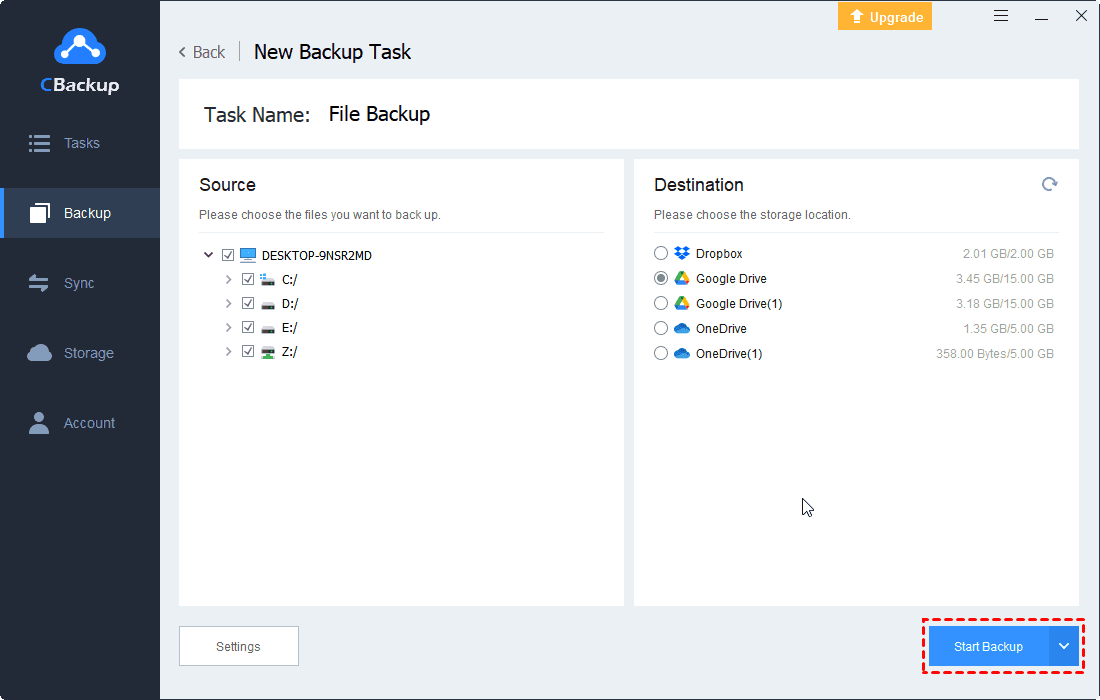
Step 5. Press the Start Backup button to back up the hard drive to Google Drive easily.
If your Google Drive storage space is not enough to hold all your hard drive files, you could use the combined cloud of CBackup to merge multiple Google Drive accounts to increase Google Drive storage space for free.
Conclusion
A missing drive on Windows 11 or 10 can be frustrating, but in most cases, it’s fixable with the right steps. Whether the issue is due to driver errors, hidden settings, file system problems, or hardware faults, the methods above offer effective solutions to restore access to your drive. Start with the basic checks, like Disk Management and the BIOS, then move on to Safe Mode, troubleshooters, or formatting if needed. With these 8 proven methods, you should be able to find and recover your missing drive on Windows.
Besides, there are things you can do to prevent data loss due to the local disk D missing. For example, backing up the D drive to OneDrive, Google Drive, or other cloud storage is an effective solution.
Learn More About Drive Missing on Windows 11/10
If you’re still unsure why your drive has disappeared or how to fix it, you’re not alone. Many users have similar questions when dealing with missing drives on Windows 11 or 10. To help you better understand and troubleshoot the issue, we’ve answered some of the most frequently asked questions below.
1. How to Create a Local Disk D in Windows 11/10
Creating a local Disk D means making a new partition on your hard drive. This helps organize files or keep system and personal data separate. If your PC has only one drive (usually C:), you can split that space to create Disk D without adding another physical drive. Windows 11 and 10 have a built-in tool called Disk Management that lets you do this easily. Below are the steps to create a local Disk D:
Steps to Create Local Disk D in Windows 11 and 10:
- Step 1. Press Win + X and select Disk Management.
- Step 2. Find your main drive (usually C:) and right-click it, then choose Shrink Volume to free up space.
- Step 3. Enter the amount of space to shrink and click Shrink — this creates unallocated space.
- Step 4. Right-click the unallocated space, select New Simple Volume, assign the drive letter D, and format it (usually NTFS).
2. How to Fix One of My Drives Saying Locations Disappeared?
If your drive shows a message like “locations disappeared,” it usually means Windows can’t access the drive due to issues like a missing drive letter, file system errors, or disconnection. To fix it, open Disk Management and check if the drive appears there. If it’s listed without a drive letter, right-click and assign one. If it shows as RAW or Unallocated, you may need to format the drive or recover the partition. Also, check the cable connection and run the chkdsk command to scan for file system errors.
3. How to Fix Windows 11 Not Showing Internal Hard Drive After Update?
If Windows 11 is not showing your internal hard drive after an update, it could be due to driver issues, corrupted system files, or changes in disk settings.
One of the most common and effective fixes for Windows 11 not showing the internal hard drive after an update is assigning or reassigning a drive letter in Disk Management.
Here are the simple steps:
- Step 1. Press Win + X and select Disk Management.
- Step 2. Locate your internal drive without a drive letter.
- Step 3. Right-click the drive and choose Change Drive Letter and Paths.
- Step 4. Click Add or Change, select a letter, then click OK.
4. How to Fix Windows 10 Hard Drive Not Showing Up
If your hard drive doesn’t show up in Windows 10, it may be due to driver problems, missing drive letters, connection issues, or corrupted partitions. To fix this, start by opening Disk Management to see if the drive appears without a letter. If so, assign a drive letter to make it visible.
Next, check Device Manager to update or reinstall storage drivers. Also, verify your hard drive’s connection inside your PC or laptop. Running the CHKDSK command can repair file system errors. If the drive still doesn’t appear, check BIOS settings to ensure the drive is enabled. Following these steps usually restores your hard drive’s visibility in Windows 10.
5. How to Fix the "Secure Erase SSD Drive D Is Missing" Problem?
If you’re facing the “Secure Erase SSD Drive D Is Missing” issue, it typically means that either Windows or your SSD management tool is having trouble recognizing the drive or its partition after a secure erase. This can occur for a variety of reasons, such as corrupted partitions, missing drive letters, or incorrect formatting following the erase.
The following steps will teach you how to fix missing Drive D by assigning a Drive Letter:
- Step 1. Press Win + X and open Disk Management.
- Step 2. Find your SSD partition that lacks a drive letter or shows as unallocated.
- Step 3. Right-click the partition and select Change Drive Letter and Paths.
- Step 4. Click Add, choose the letter D, then click OK.

Secure & Free
