
5 Effective Solutions to Dropbox Taking Up Space On Mac Issue
This article will show you how to solve Dropbox taking up space on Mac issue efficiently. You will find 5 solutions to this issue with detailed steps and tips that you may need here. Please read on.
by Jonna Lasted Updated February 1, 2023
Dropbox taking up too much space on Mac!
“Hi all, I am using Dropbox on a Mac OS 10.13. When I check the info for my dropbox folder, it shows very little of the data is locally stored (about 6MB of the 170GB in this folder). However, my Mac thinks the hard drive is full and does not allow me to download any additional files. What should I do to solve this issue?”
Dropbox is a popular file backup and storage tool that provides great value for individuals and enterprises. With it, you can backup to files to cloud and access these files across multiple devices including computers, phones, and tablets.
Meanwhile, countless users rely on Dropbox to share files with friends, family, and coworkers. The file-sharing feature of Dropbox enables users to easily access shared resources so that users don't need to send files back and forth.
But one of the disadvantages of Dropbox is that keeping all these files on the computer takes up space. Then, your Mac may think the hard drive is full and does not allow you to download any additional files although you only have a few data in the Dropbox folder.
How to solve Dropbox taking up space on Mac issue?
If you are facing this Dropbox taking up too much space on Mac issue, don’t worry, you can read on to learn the 5 effective solutions to this issue with detailed steps in the following part. You can try them one by one until your problem gets solved.
Solution 1. Restart Dropbox app
Generally, most issues can be solved by restarting, so, you can try to quit the Dropbox app on your device and restart it to see if it can back to normal.
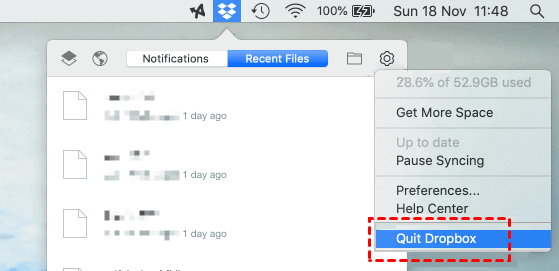
1. Click the Dropbox menu in the menu bar of your Mac.
2. Click your profile picture or initials.
3. Click Quit Dropbox.
4. Restart the Dropbox app to see if it can work normally.
Solution 2. Use selective sync
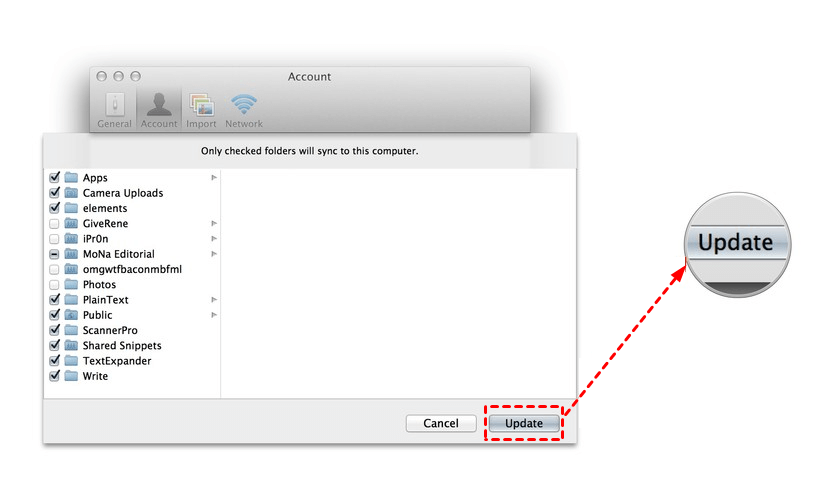
Selective sync is a feature that enables you to specify which folders will be copied locally to your Mac. With this feature, you can remove files from your hard drive and keep them just in your Dropbox online account to free up some space on your hard drive. Follow the steps below to enable Dropbox selective sync on Mac:
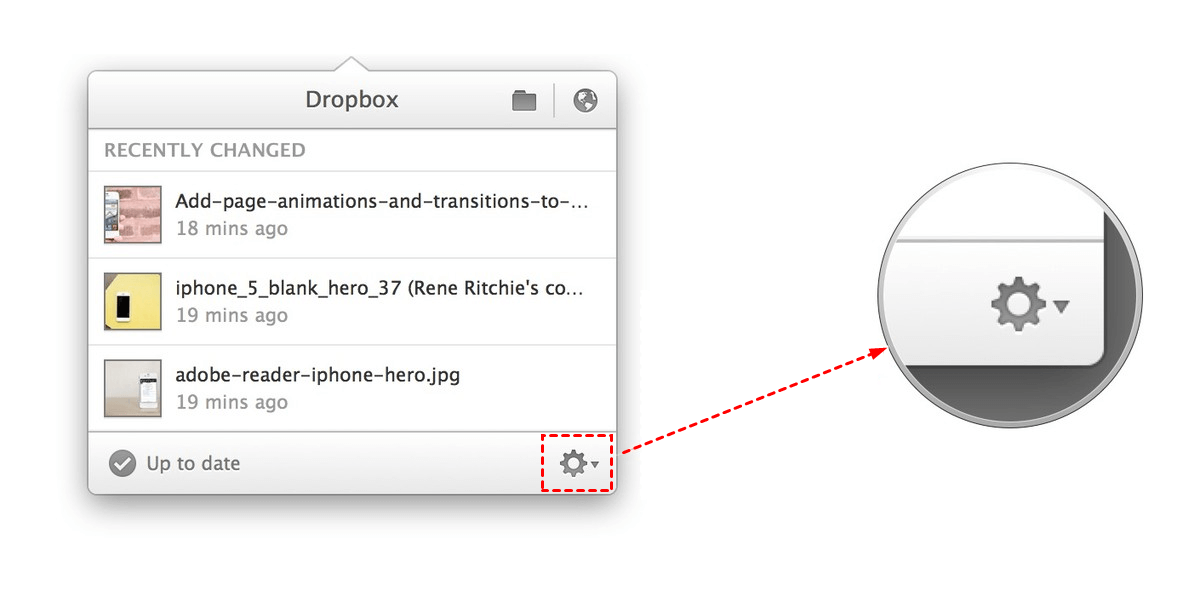
1. Go to the menu bar and click on the Dropbox icon.
2. Click on the gear icon in the lower right-hand corner.
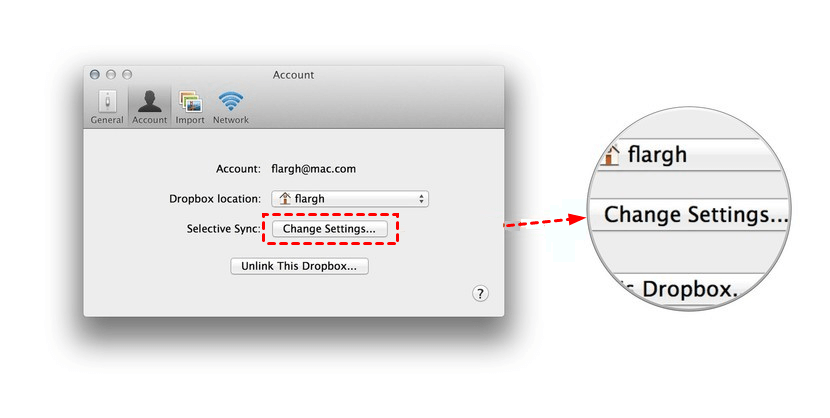
3. Click on Preferences and then click on the Account icon.
4. Click on the Change Settings... button next to Selective Sync.
5. Check only the folders you want to be copied locally to your computer and click the Update button.
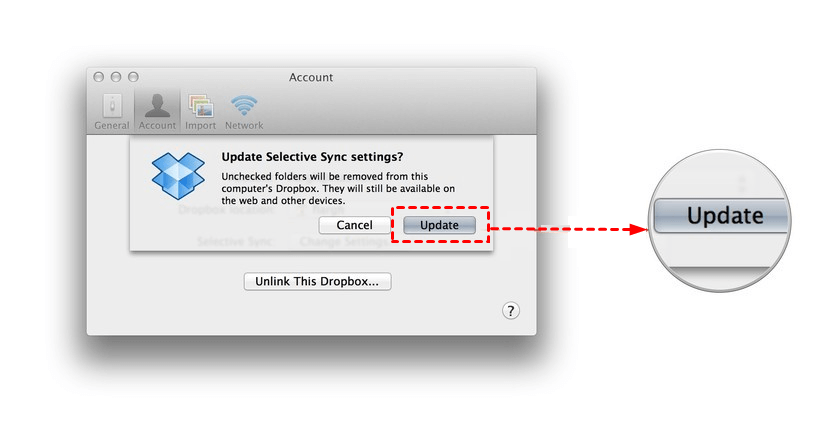
6. Dropbox will ask you if you want to update Selective Sync settings. Click Update. Dropbox instantly removes the unchecked folders.
Solution 3. Delete files from your hard drive
On a Mac, drag the item to the Trash in the Dock or select the item, then press Command-Delete. If the item is locked, click "Continue" to confirm that you want to move the locked item to the Trash. Items moved to the Trash on your Mac will not be deleted unless you empty the Trash. So, you can go to the Trash to empty the trash.
Solution 4. Clear the Dropbox cache folder
Generally, there is a hidden folder that containing Dropbox cache stored in your Dropbox root folder, named ".dropbox.cache". Only when the function of viewing hidden files and folders is enabled in the operating system, you can see the folder.
If you delete a large number of files from Dropbox, but the hard drive of your computer does not reflect these deletions, the deleted files may be saved in the cache folder. So, you can manually clear the cache to clear some space on the hard drive by following the steps below:
1. Open the Finder and select Go to folder... from the Go menu.
2. A dialog box should appear. Now copy and paste the following line into the box and press the return key:
~/Dropbox/.dropbox.cache
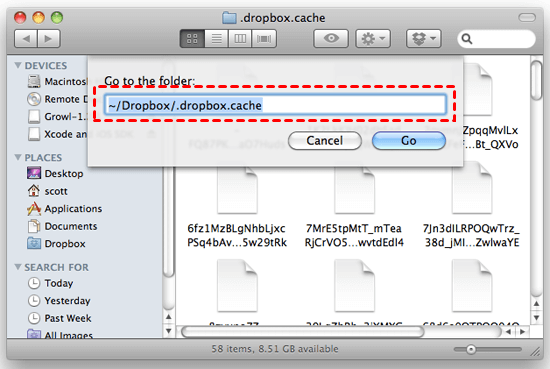
3. This will take you directly to the Dropbox cache folder. Delete the files in your cache by dragging them out of the Dropbox cache folder and into your Trash.
Solution 5. Set online-only files to zero “logical” size
Smart Sync is a new feature that Dropbox offers to help users browse and access all files in Dropbox without taking up space on your hard drive. If you use Smart Sync with macOS High Sierra (10.13) or higher and see the error message "Your startup disk is almost full", you can follow the steps below to check which files are taking up the most space on the disk:
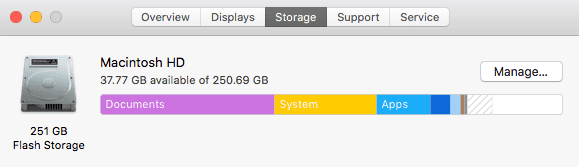
1. Click the apple icon in the upper-left corner of your desktop.
2. Click About This Mac > Storage > Manage…. one by one.
3. To see which files are really causing the disk space usage, adjust your Dropbox settings so that online-only files have both logical and physical size set to zero. To do so:
1. Sign in to dropbox.com.
2. Click your avatar (profile picture or initials) in the upper right corner.
3. Click Settings and then toggle Smart Sync update for Mac on.
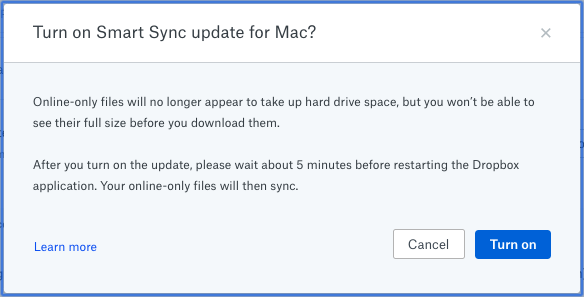
✎Note: This setting may take some time to update. If you don’t see the update reflected after a few minutes, close the Dropbox desktop app, then reopen it.
Bonus tip: backup the most files with the least costs
If your storage space of Dropbox is limited or full but you don’t want to pay for more storage space, you can try the two tricks to expand your backup space without pay any money.
Tip 1. Merge multiple Dropbox accounts
Although each Dropbox account offers 2 GB of free storage space only, you can register multiple Dropbox accounts and merge the Dropbox accounts to enjoy larger, even unlimited storage space. To achieve that, you can rely on a free tool called CBackup, which allows you to add Dropbox accounts as many as you have. And with the combination feature of CBackup, you can easily combine cloud storage to get more free Dropbox storage space.
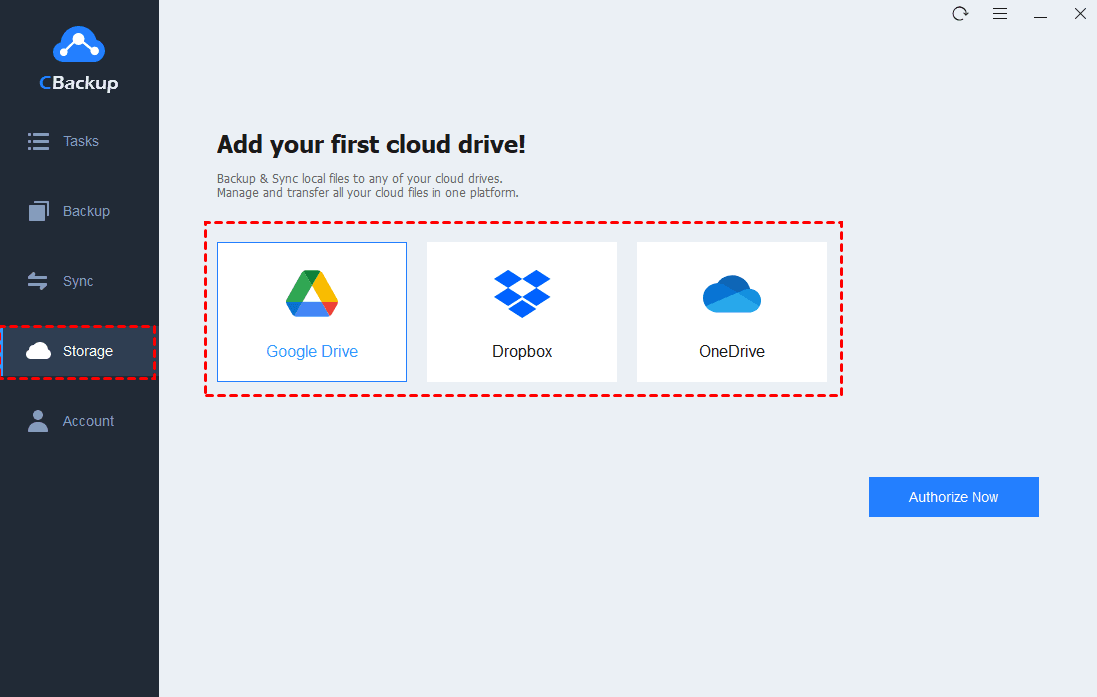
1. Please create a CBackup account for free and sign in to CBackup desktop app.
2. Navigate to the Storage tab, select Dropbox and click Authorize Now to add this drive. then follow the steps to sign in to your Dropbox account and grant authority to CBackup. Just add Dropbox accounts as many as you have.
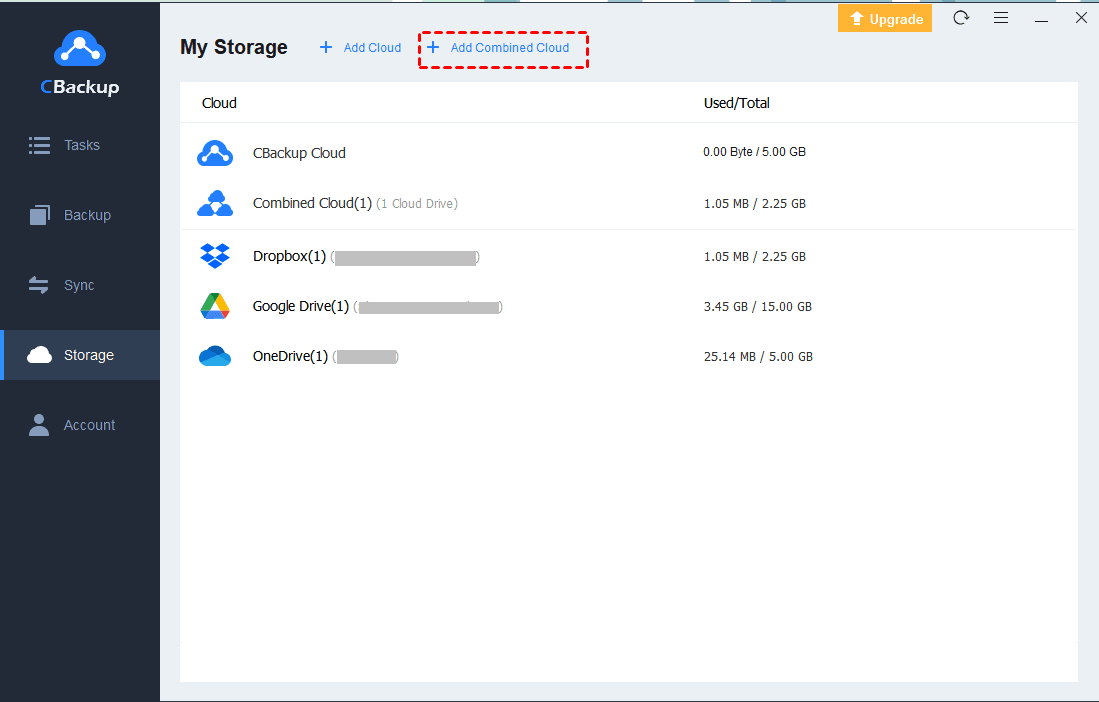
After adding, you can combine the storage space of each Dropbox accounts into one to backup more photos or videos as follows:
1. Click the Storage > + Add Combined Cloud.
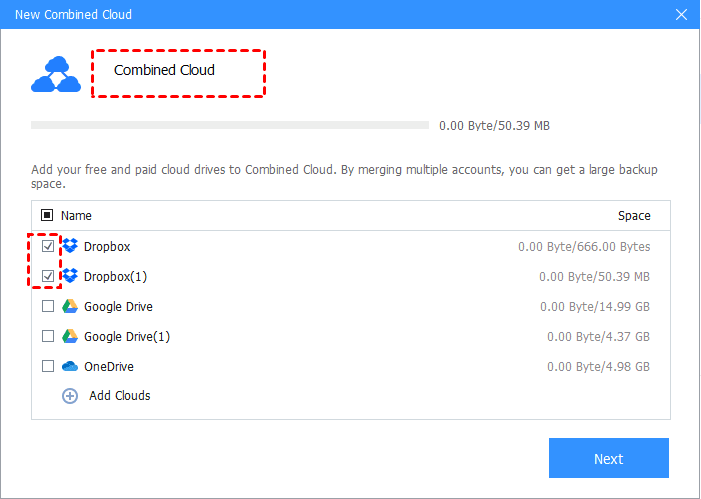
2. Rename the Combined Cloud, and tick all your Dropbox accounts, and hit Next.
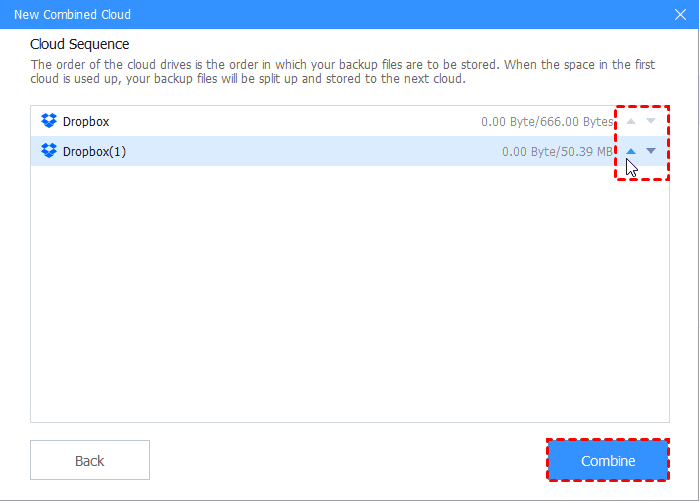
3. Determine the order of all your Dropbox accounts, and click Combine. Then all your Dropbox accounts has been merged.
Tip 2. Use some other free cloud storage options
Besides the methods above, you can also distribute some files in other cloud storage services that offer a certain amount of free storage to save storage costs:
-
Box (10 GB, 5 GB free space)
-
Amazon Drive (5 GB available space)
-
Google Drive (15 GB free)
-
iCloud storage (5 GB available space)
-
CBackup (10 GB free)
Conclusion
The contents above have shown how to solve the Dropbox taking up space on Mac issue with 5 solutions. Normally, these methods are enough to help you solve the problem smoothly. If you need more Dropbox storage space without upgrading your accounts, you can try the two tips above to enlarge your backup space for free.

Secure & Free
