

How to Delete All Photos from Google Photos Safely
Too many unwanted pictures taking up space? You can delete photos from Google Photos in just a few steps. Whether you're using a computer or mobile device, this guide walks you through multiple ways to remove your images quickly and safely. Learn how to clear your entire photo library, free up storage, and manage your Google account more efficiently.

by Richard Lasted Updated August 27, 2026


Google Photos does not offer a universal “Select all” button for an entire library. To delete many photos, use Google Photos on the web, select the first item, hold Shift, select the last item in a range, and move the batch to Trash. Repeat as needed. Backed-up items remain in Trash for 60 days unless you empty it; items that were not backed up may remain for 30 days.
Choose the Right Way to Delete Google Photos
| Your goal | Best method | What to watch for |
|---|---|---|
| Delete a large part of your library | Select ranges on the Google Photos website | There is no one-click Select all; use batches |
| Delete a few photos | Select them in the mobile app or website | Deleting in the app may also remove device copies |
| Remove cloud backups but keep phone copies | Use Undo backup for this device | Leave Backup off to prevent re-uploading |
| Free Google Account storage immediately | Delete items, then empty Trash | Emptying Trash is permanent |
Before You Delete: What Actually Gets Removed?
Deleting an item from Google Photos can remove more than the cloud copy. According to Google Photos Help, an item you delete may also disappear from synced Android devices, iPhones, iPads, Google Photos albums, shared albums and conversations you added it to, and some highlight videos.
The same action does not automatically delete copies stored in Google Drive, Gmail, Blogger, or YouTube. Archive is not a separate backup: an archived photo is still part of your Google Photos library and still uses storage when the item counts toward your quota.
- Backed-up photos and videos: stay in Trash for 60 days.
- Items that were not backed up: may stay in Trash for 30 days.
- Trash emptied manually: the items are permanently deleted and cannot be restored through Google Takeout.
- Storage reporting: the recovered space may take time to appear, and deleting items that do not count toward your quota will not free storage.
How to Delete All Google Photos in Bulk on a Computer
This is the most practical official method for a large library. It works in a desktop browser on Windows, macOS, Linux, and ChromeOS.
Step 1. Open the Google Photos website and confirm that you are signed in to the correct Google Account.
Step 2. Hover over the first photo in the range and click its checkmark.
Step 3. Scroll to the last photo you want to remove. Hold Shift and click that photo’s checkmark to select the range. For a very large library, choose manageable date ranges rather than trying to load years of photos at once.
Step 4. Click the trash icon, select Move to Trash, and wait for the batch to finish before selecting the next range.

Step 5. Repeat until the library is clear. Check Archive and Locked Folder separately if you use them.
Step 6. Open Trash. Keep the items there if you want a recovery window, or choose Empty Trash to delete them permanently and reclaim eligible storage sooner.
How to Delete Google Photos on Android, iPhone, or iPad
Use the app when you only need to remove selected items. If Backup is on, deleting a backed-up photo in the Google Photos app can also remove it from devices connected to the same library.
Step 1. Open Google Photos and verify the Google Account shown under your profile picture.
Step 2. Touch and hold the first photo, then tap any other photos or videos you want to include.
Step 3. Tap the trash icon and confirm the move to Trash.
Step 4. To delete them permanently, open Collections > Trash and empty Trash. Skip this step if you want to retain the recovery window.
How to Delete Google Photos but Keep Them on Your Phone
For all photos currently stored on one phone, the clearest option is Google Photos’ Undo backup for this device. It removes those backed-up copies from Google Photos while leaving the local files on that device.
Step 1. Open the Google Photos app.
Step 2. Tap your profile picture > Photos settings (or Google Photos settings) > Backup.
Step 3. Scroll down and tap Undo backup for this device.
Step 4. Read the confirmation carefully, check the acknowledgement box, and tap Delete Google Photos backup.
Backup is then turned off on that device. The removed items also disappear from Google Photos albums, shared albums, search results, and memories. Locked Folder items and device-folder items may be included.
Keep Only Selected Photos on the Device
- Turn off Backup on every phone or tablet where the local copies must remain.
- In a computer or mobile browser, not the Google Photos app, open the Google Photos website.
- Delete the selected backed-up items from the website.
- Wait a few minutes on the phone while connected to Wi-Fi, then close and reopen Google Photos.
- Open an item’s details to confirm it is now a local copy and is not backed up.
If you turn Backup on again, local items can be uploaded again. Google also warns that a device copy may sometimes be deleted after Backup is re-enabled. Keep a second verified copy before changing the setting.
How to Free Up Google Photos Storage Without Deleting Everything
If storage, not privacy, is the problem, first open Google’s storage manager. Review large photos and videos, blurry photos, screenshots, and unsupported videos, then delete only what you do not need.
- Google Account storage is shared by Google Photos, Google Drive, and Gmail, so check all three services.
- Photos backed up in certain legacy quality settings before June 1, 2021 may not count toward the quota; deleting them may recover no space.
- Free up space on this device removes safely backed-up local files from the phone. It does not clear the Google Photos cloud library.
- Moving photos to Archive hides them from the main Photos view but does not reduce storage use.
Back Up Photos from One Cloud to Another Before Deletion
A second cloud copy gives you another recovery location if photos are deleted from the original account. CBackup’s cloud-to-cloud backup can copy files directly between supported services such as Google Drive, OneDrive, and Dropbox without downloading them through your computer during the backup task.
Step 1. Export the photos you want to keep with Google Takeout. Extract the archive, open a sample of photos and videos to verify it, and upload the verified folder to a supported source cloud such as Google Drive.
Step 2. Sign in to CBackup. Open Storage, click + Add Cloud, and authorize both the source cloud and a separate destination cloud.
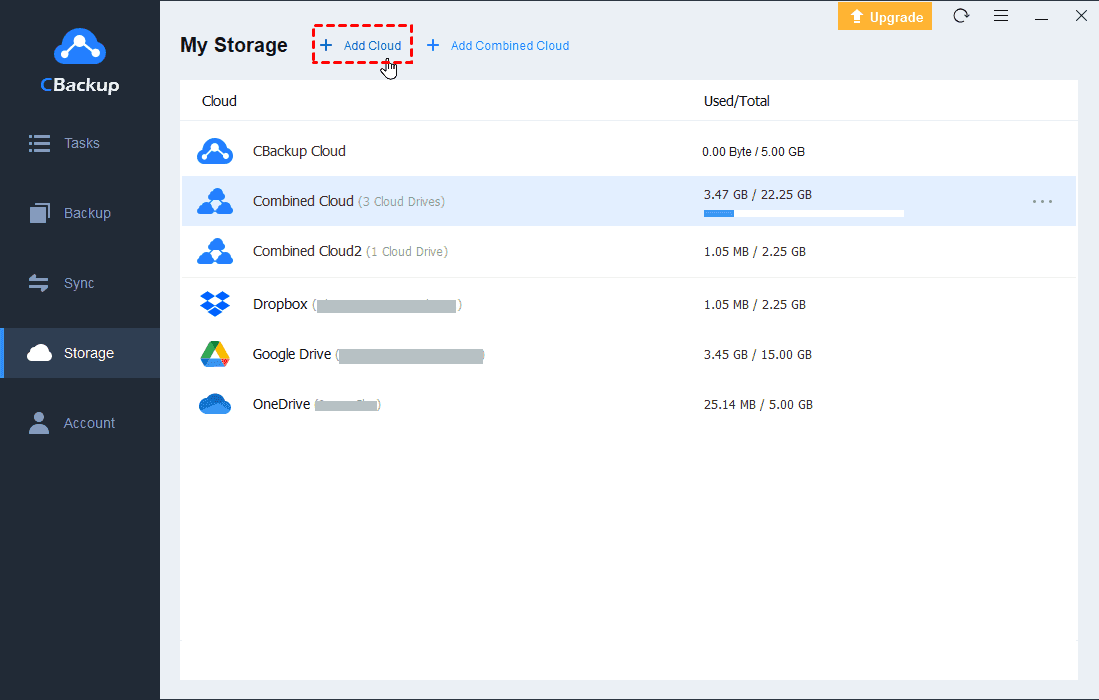
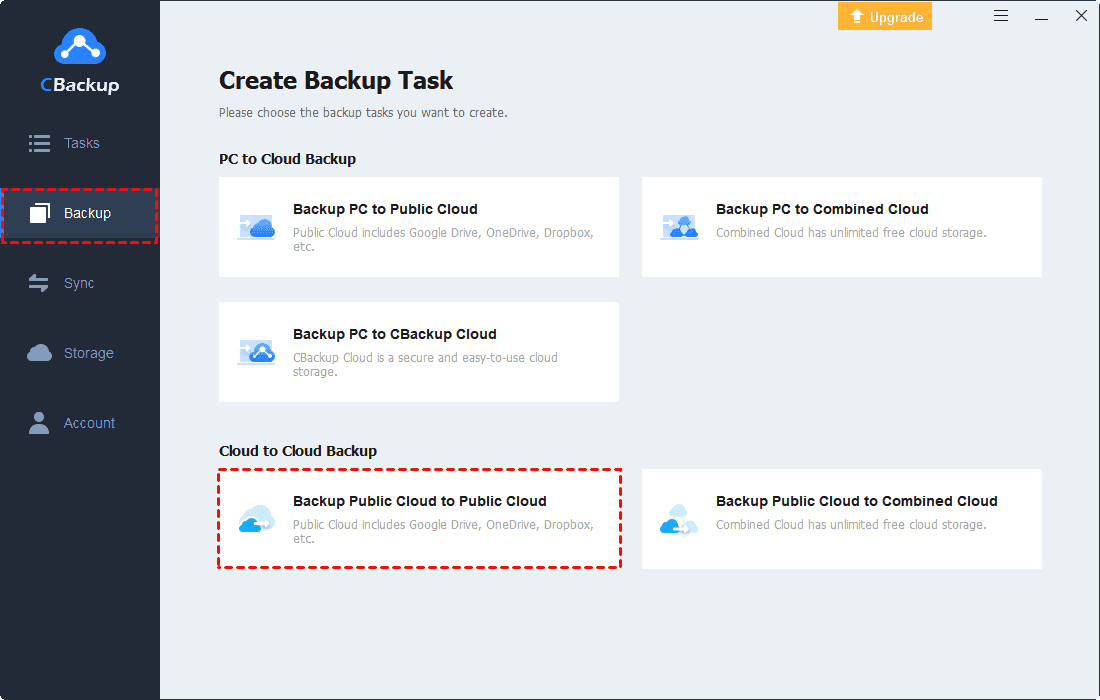
Step 3. Go to Backup and select Backup Public Cloud to Public Cloud.
Step 4. Select the cloud folder containing the exported photos as the source. Choose another connected cloud, such as OneDrive or Dropbox, as the destination. Confirm that the destination has enough available space.
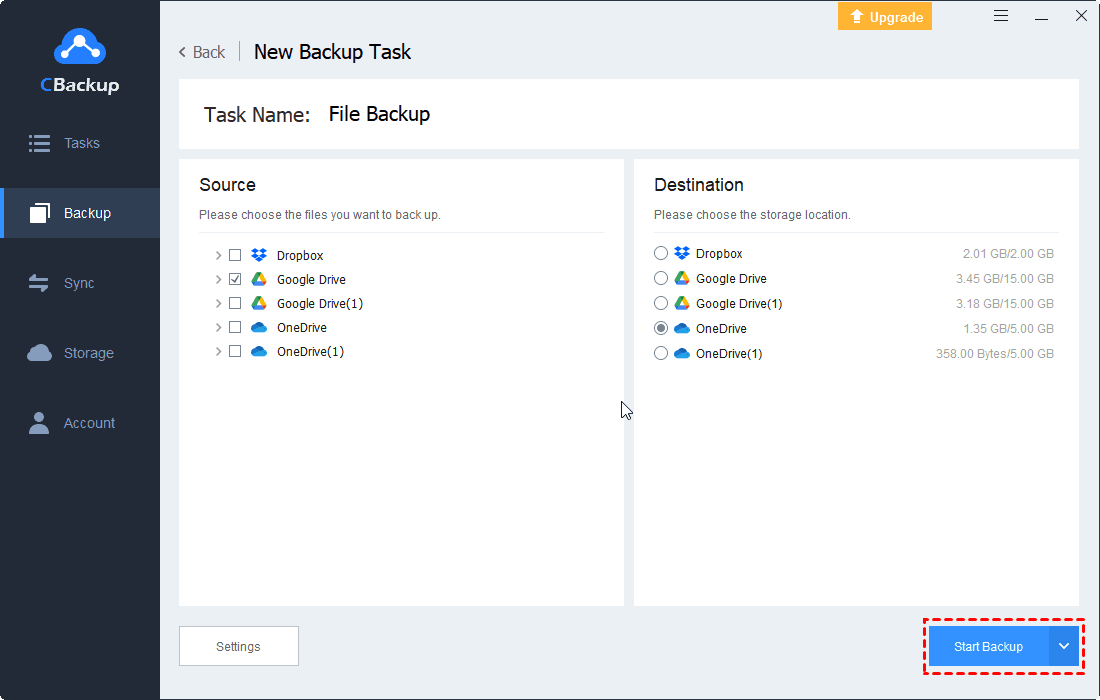
Step 5. Optionally configure a schedule, file filters, or email notifications, then click Start Backup. When the task finishes, check representative photos and videos in the backup task or destination before emptying Google Photos Trash.
Use a Backup task rather than a Sync task for this safety copy. A sync can propagate later changes or deletions, while a backup is intended to preserve a recoverable copy.
Frequently Asked Questions
Can I select all photos in Google Photos at once?
No universal Select all control is available for an entire Google Photos library. On a computer, select the first photo, scroll, hold Shift, and select the last photo in a range. Repeat with smaller batches until you have removed everything you intend to delete.
Does deleting photos from Google Photos delete them from my phone?
It can. When Backup is enabled, deleting in the Google Photos app can remove the item from synced devices as well. To keep local copies, use Undo backup for this device, or turn off Backup on every affected device and delete the cloud copies through a browser.
Why did deleting photos not free up Google storage?
The items may still be in Trash, the storage total may not have refreshed yet, or the deleted photos may not have counted toward your quota. Emptying Trash is permanent, so verify your backup first.
Can I recover photos after emptying Trash?
No. Google states that permanently deleted items cannot be restored, and Google Takeout cannot recover them. Check your downloaded or cloud backup before emptying Trash.
Will deleting an album delete its photos?
Deleting an album does not normally delete the photos and videos from your library. Deleting the individual items from the Google Photos library, however, also removes them from albums that contain them.
How do I stop Google Photos from backing up new pictures?
In the Google Photos app, tap your profile picture > Photos settings > Backup, then turn Backup off. Repeat this on any other device signed in to the same account if you do not want those devices to upload photos.
Conclusion
For a large cleanup, use Google Photos on a computer and delete verified date ranges in batches. If the photos must stay on your phone, use Undo backup for this device or turn off Backup everywhere before deleting through the website. Keep Trash intact until you have checked a separate backup; empty it only when you are certain the selected files can be removed permanently.
Secure & Free