
Backup Windows to Network Drive Automatically in 3 Ways
Backing up Windows to your network drive is an efficient method to protect your system settings and installed programs. Read this tutorial to get the job done hassle-free.
by Jonna Lasted Updated March 17, 2023
Can Windows backup to a network drive?
Everyone has some important software installed on the computer or has their own unique Windows system settings, but a system crash caused by operational errors or virus malware invasion may require a system reinstallation to get it to run properly again. To prevent such events, it is better to backup Windows in advance.
Can you backup Windows to a network drive? If you have such a question, you can find the answer here. In this article, we will share with you how to get Windows backed up to your network drive using a third-party tool and some native Windows tools.
Backup Windows to network drive with 3 free methods
After backing up your Windows, you can easily restore your computer no matter if there is a system crash or reinstallation. How can you make PC systems like Windows 10 backup to your network drive? Let's get to the point.
Way 1. Backup Windows to network drive with AOMEI Backupper
The easiest server backup method is to use professional Windows backup software, that is AOMEI Backupper Server. This is a multi-featured backup tool for both personal and business that provides users to quickly backup Windows systems and easily restore required data when needed. In addition to system backup, it also offers file backup, disk backup, partition backup, file synchronization, and other features. Also, you can use it to backup Windows system to OneDrive, Google Drive, and other cloud storage.
Download AOMEI Backupper and perform Windows auto backup to a network drive with the tutorial below:
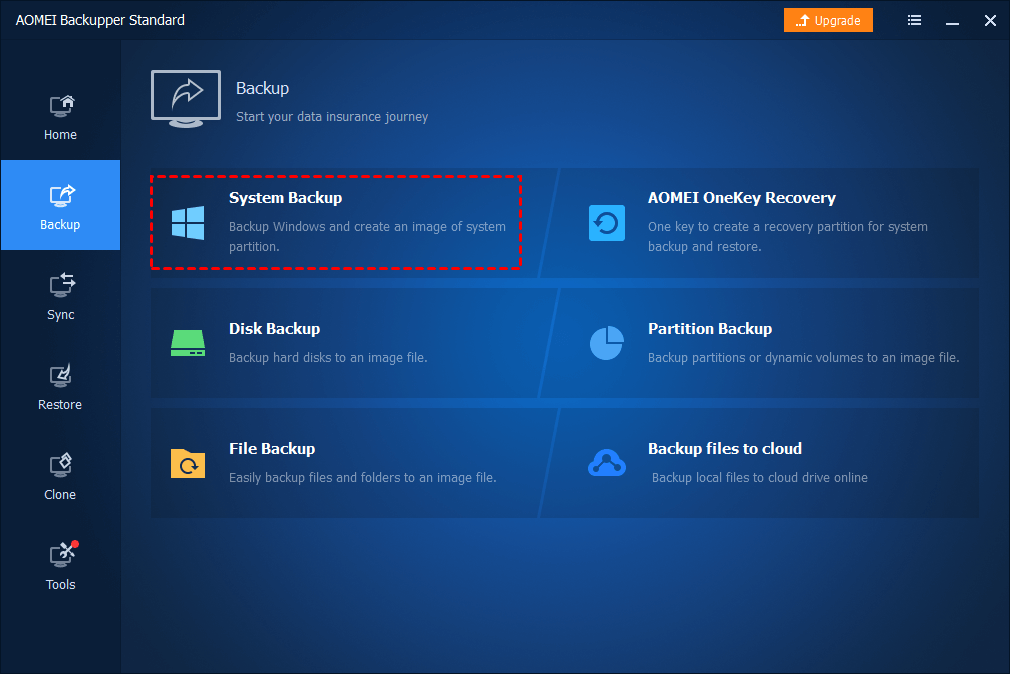
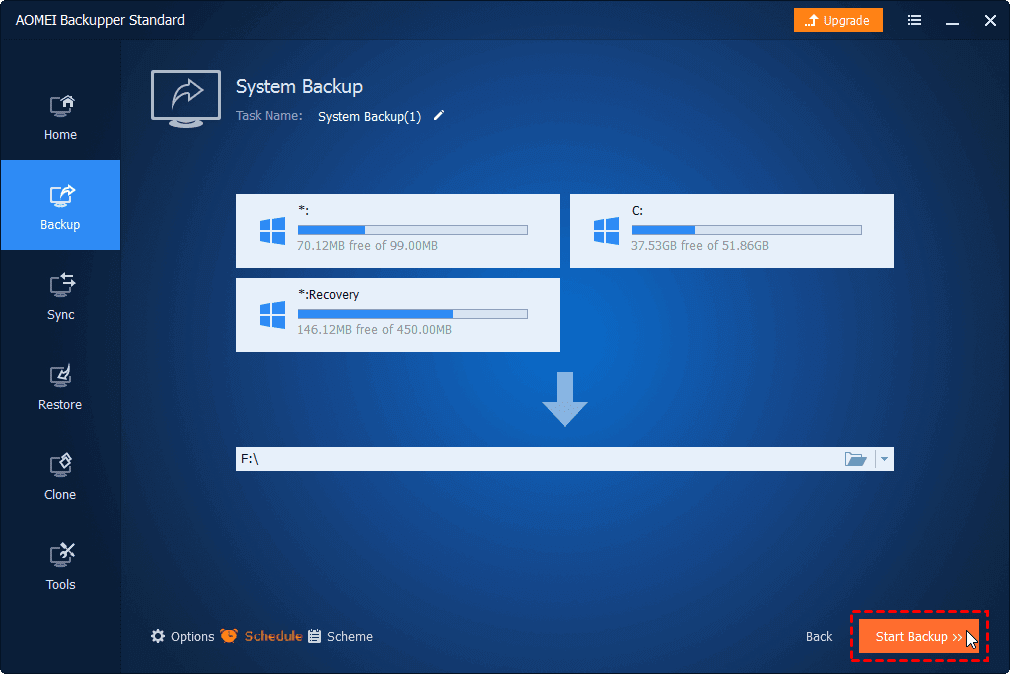
Step 1. Install and run AOMEI Backupper. Then, head to the Backup section and select System Backup.
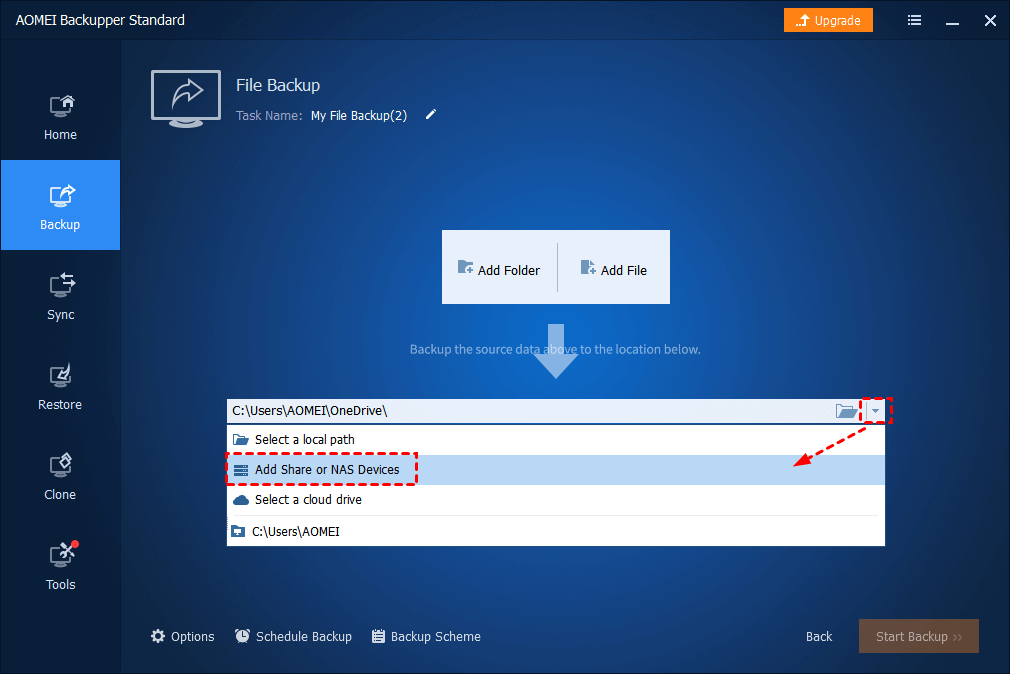
Step 2. System-related partitions will be selected automatically. Then, click the inverted triangle to choose Add Share or NAS Device.
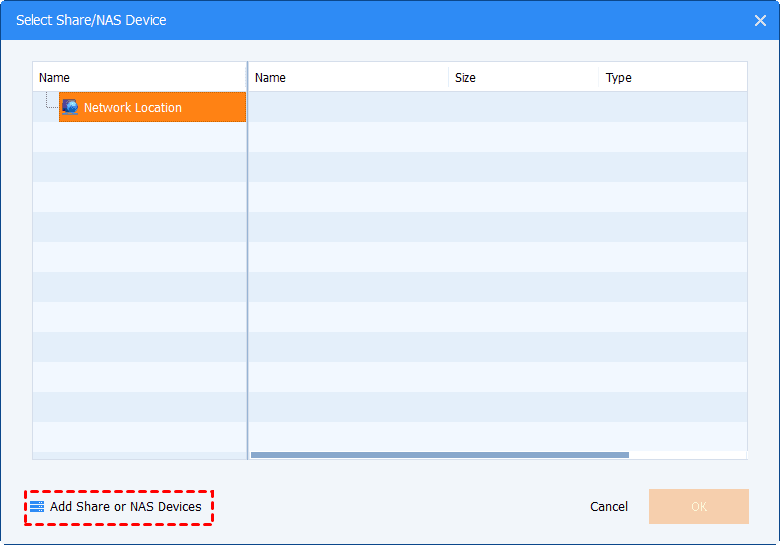
Step 3. Subsequently, click Add Share or NAS Device and input the Display Name and Network Path and choose a shared drive under the path.
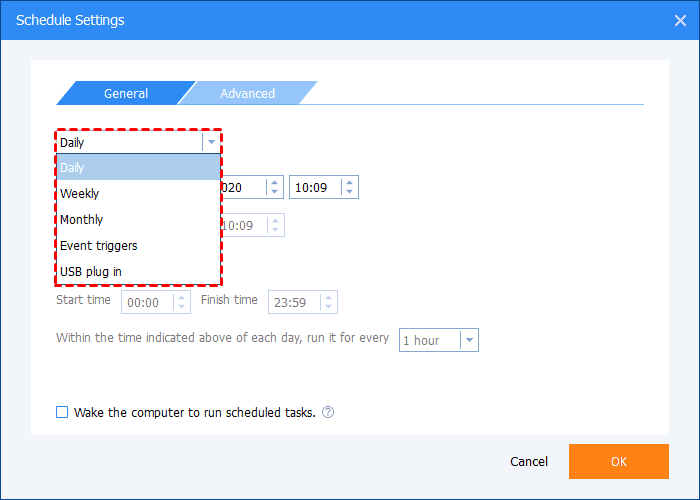
Step 4. (Optional) Tap on Schedule to set up auto backups for your Windows on a every day/weekly/monthly schedule.
Step 5. Finally, begin to backup Windows to your network drive by clicking Start Backup.
Way 2. Back up Windows to shared drive using Backup and Restore
Backup and Restore is a tool that comes with Windows for backing up and restoring data included with Windows Vista and later operating systems. It allows you to backup files and folders on Windows PCs as well as create system image backups in case of data corruption, system crash, hard disk drive failure, or malware infection.
You can use Backup and Restore to create a Windows Server backup to a network drive with the following steps:
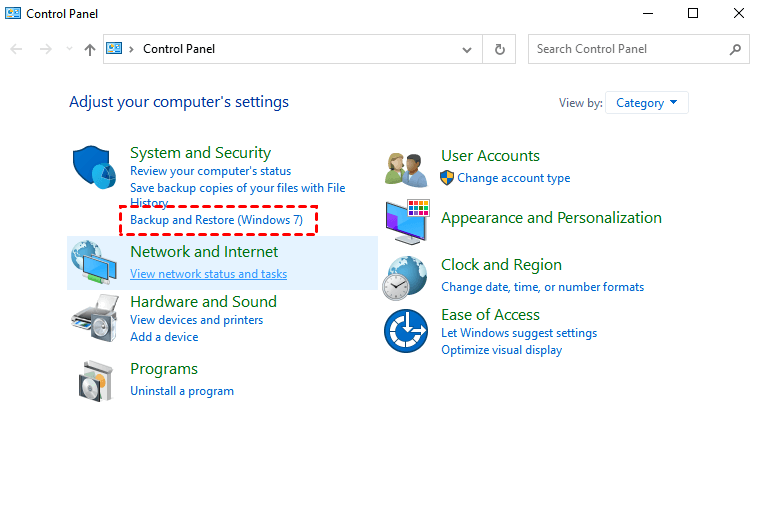
Step 1. Navigate to Control Panel and click on Backup and Restore (Windows 7) in System and Security.
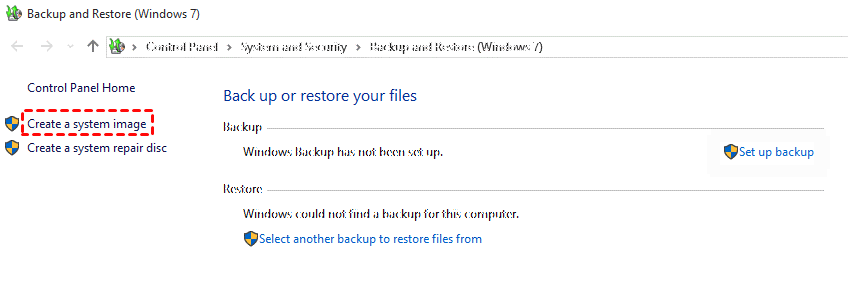
Step 2. Click Create a system image on the left side.
Step 3. Select On a network location and click on Next to enter the required information.

Step 4. Then, select the targeted drives, confirm your auto backup settings, and start to create a backup for your Windows Server.
Way 3. Create Windows backup to network drive via File History
File History is the primary backup tool for Windows 8 and later operating systems. The difference between File History and Backup and Restore is that the main purpose of the former is to back up personal files. If you want to create a copy of files on Windows to a network drive, File History is a logical choice, which will automatically update copies of files that need to be backed up and keep previous versions of files so you can access and restore them when required.
Follow the guide beneath and get Windows backup folders to your network drive easily:
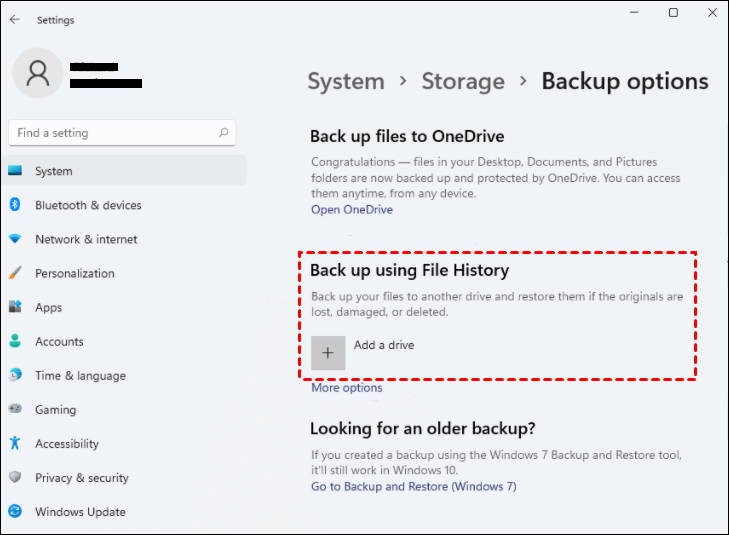
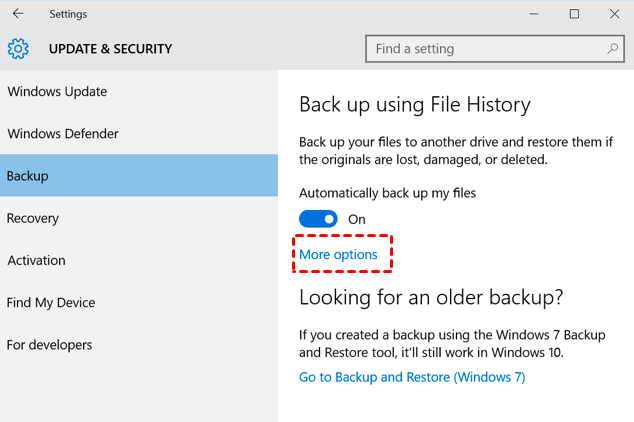
Step 1. Click Start > Settings > Update & security > Backup in turn.
Step 2. Tap on Add a drive under Back up using File History. Then, select the network drive to save your data.
Step 3. Select the More options to access automatic backup options and click Back up now to initiate the backup task.
Further Reading: Backup your Windows PC to cloud with CBackup
Compared to NAS storage devices, cloud drives have the advantages of no upfront costs, low storage costs, and no need for professional skills. And cloud storage is more suitable for personal data storage and easy to expand the storage space. Using CBackup to back up important computer files, specific computer partitions, or your entire computer to clouds is also an effective way to protect your Windows PC.

CBackup is a reliable cloud backup service dedicated to local data-to-cloud and cloud-to-cloud data backup. When you use CBackup to backup your computer, you can back up files to cloud for free, as well as other third-party public clouds like Google Drive. Using its scheduled backup feature, you can easily complete daily, weekly, and monthly automatic backups of your files.
In addition, it offers unlimited version management, allowing you to restore the needed file version as easily as possible. If you find that your cloud storage space is not enough, you can also use the cloud storage combination feature of CBackup to merge multiple Google Drive accounts and other clouds to expand the space for free. You can follow the detailed guide to start backing up your computer to clouds.
Step 1. Sign up for a CBackup account. And then, download and log in to it.
Step 2. Select Backup on the left bar and click on Backup PC to cloud.
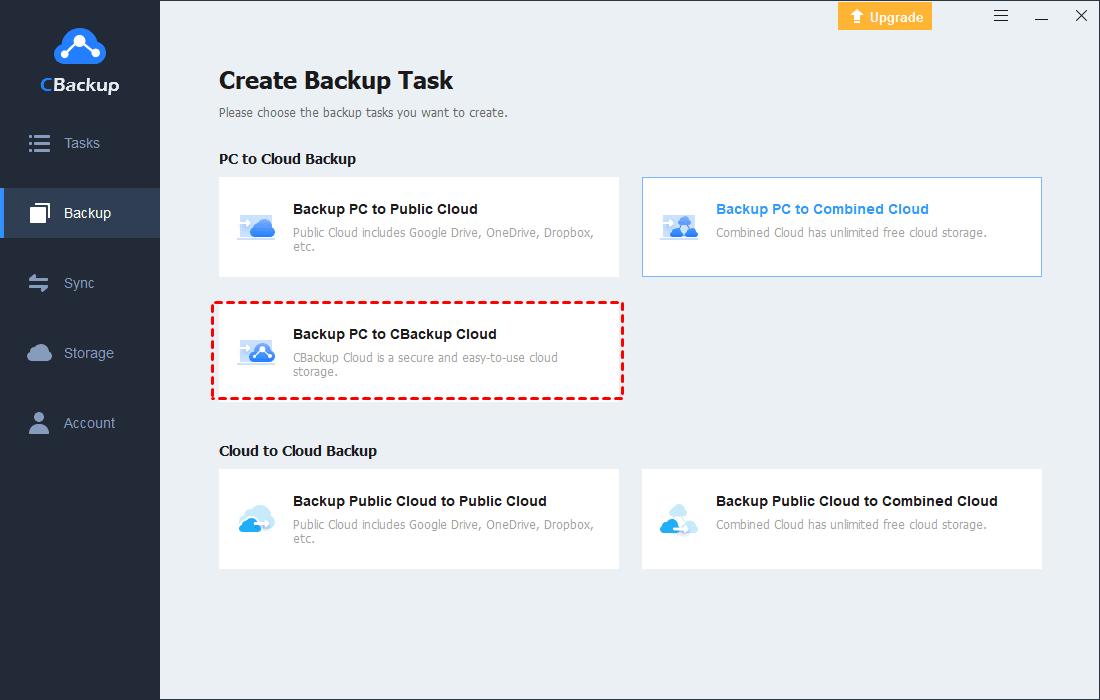
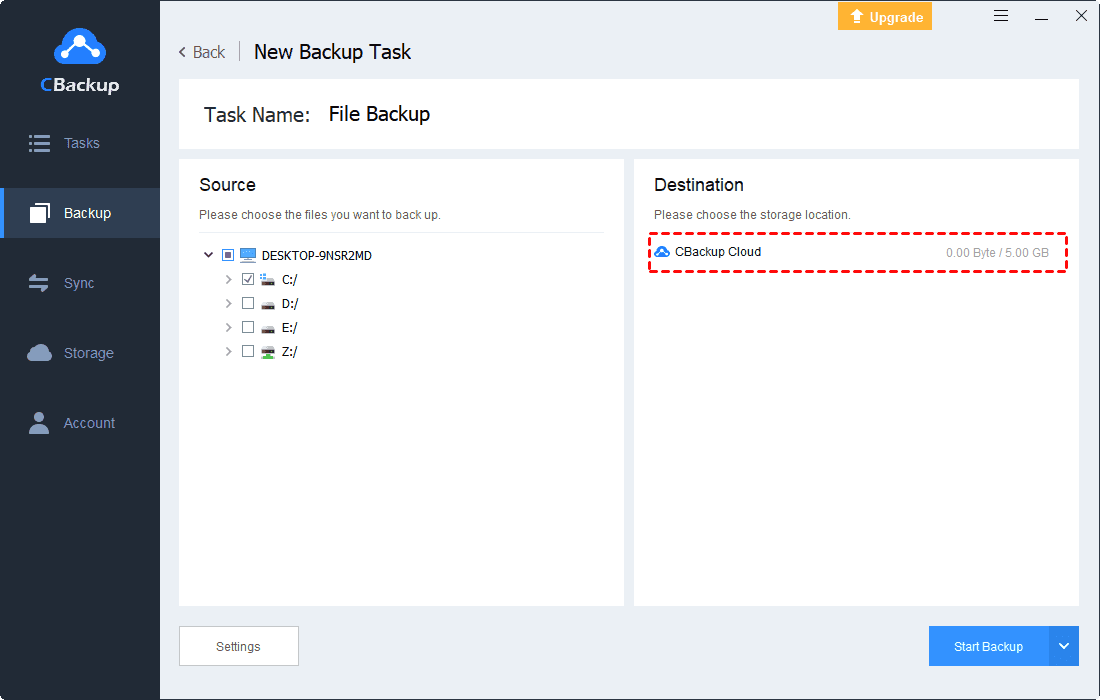
Step 3. You can specify the Task Name and choose the whole computer or a single file that you want to backup. After that, press Start Backup to start the PC to cloud backup task.
✎Note: You can backup files to Google Drive, OneDrive, and other cloud drives with ease if needed.
Conclusion
This guide provides instructions for backing up Windows to a network drive. Windows systems can be corrupted for a variety of reasons, such as virus infections, application cache errors, etc. It is foolproof to back up your Windows system or important computer files in advance. When you encounter these problems, restoring the system and backing up files can easily solve them.

Secure & Free
