
How to Backup Windows 10 to USB | 3 Useful Ways Included
On this page, you will see 3 different ways to backup Windows 10 to USB and 1 tip for backup your computer with ease. Please keep reading and learn simple steps for them.
by CBACKUP Lasted Updated September 30, 2024
Why Backup Windows 10 to USB?
There are many different ways to backup your computer on Windows 10. And some users choose to backup Windows 10 to USB for convenience.
If you backup Windows 10 to cloud storage, it will cost you too much time to reinstall your system and programs, settings. Besides, data recovery is a complicated task. But backing up Windows 10 to USB can make it easier to recover data on your computer without downloading time.

What’s more, a USB flash drive is very durable and not expensive, and everyone can afford one. It is also easy to bring out and in.
3 Effective Ways to Backup Window 10 to USB
Let’s begin to know more information about how to backup Windows 10 to USB. Here we provide 3 different methods including Backup and Restore, AOMEI Backupper Standard, and recovery drive. They are also suitable for other versions of Windows system.
Way 1. Use Backup and Restore
First, we will introduce how to use Backup and Restore to create a system image of Windows 10 on USB. Before all, you need to create a sub-folder in the USB drive. If not, you may receive the “the drive is not a valid backup location” issue message. Then follow these steps to backup Windows 10:
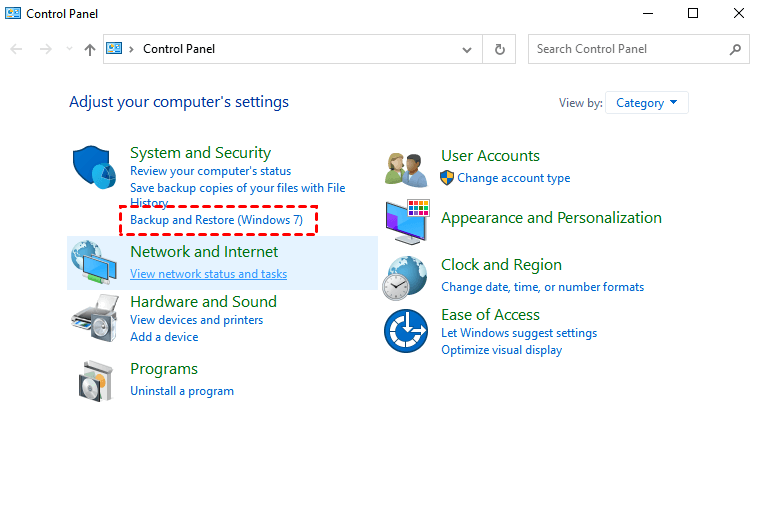
1. Find Backup and Restore (Windows 7) in Control Panel.
2. In the left menu, select the Create a system image option.

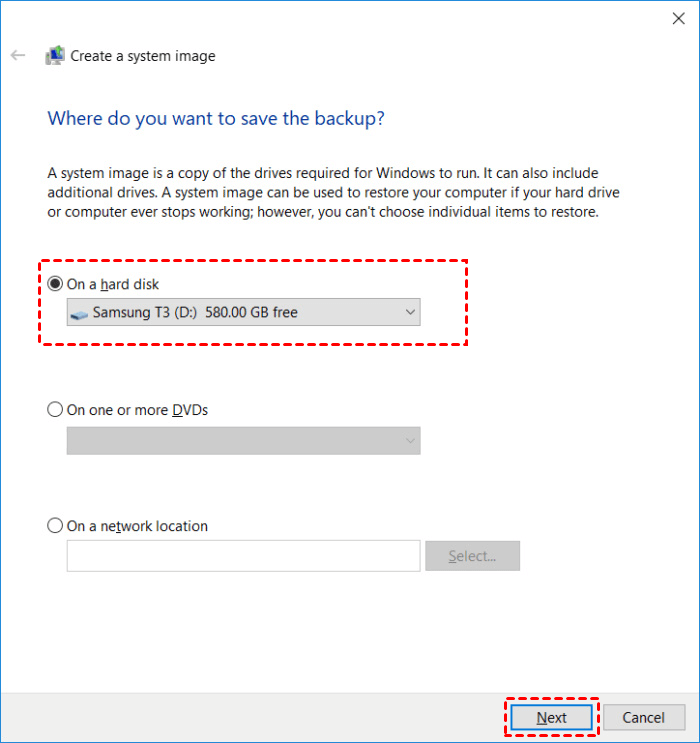
3. Select your USB trash drive as the target location of your backup. Then click on the Next button. After finishing your backup settings, click Start Backup to start your Windows 10 backup.
☛ Note: If you want to restore the system image, you can go to the Backup and Restore (Windows 7), then click on the Restore my files button.

Way 2. Create a Windows 10 Recovery Drive
You can also use a Windows built-in tool to create a Windows 10 recovery drive to USB. Then you could back up system files to the recovery drive. When your computer is attacked, it will help you recover your computer. Let’s see how to create a system image recovery Windows 10 using USB:
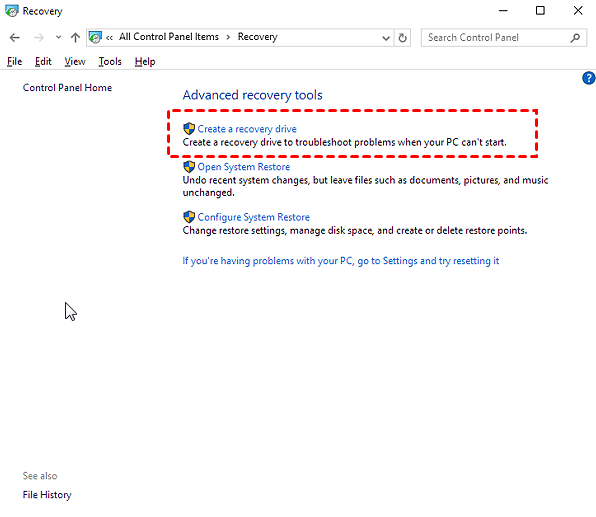
1. Go to Windows 10 Control Panel, then click on the Recovery option.
2. Select the Create a recovery drive option.
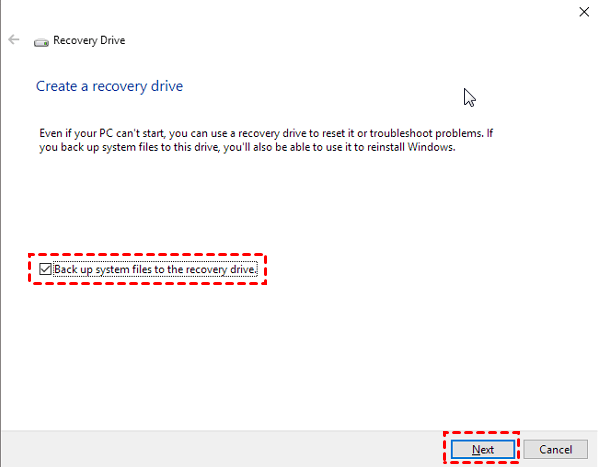
3. Tick the box next to “Back up system files to the recovery drive” and press Next.
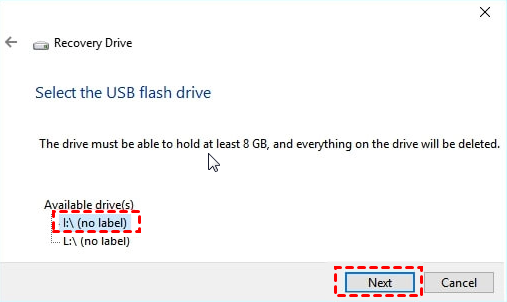
4. Choose your USB flash drive as the recovery drive, select Next.
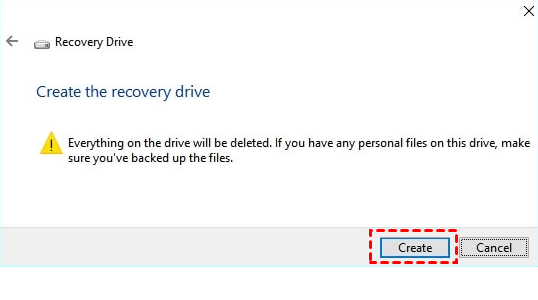
5. After confirming the warning message, click on Create.
6. When you see the “The recovery drive is ready” message, click on Finish.
Way 3. Use AOMEI Backupper Standard
If you feel difficult to create system image Windows 10 on USB, you could try the third-party tool - AOMEI Backupper Standard. It is a great backup tool for hard disk, SD card, external hard disk, NAS device, and so on. With the help of AOMEI Backupper, you can backup Windows 10 to USB with ease. Let’s see the simple guideline:
1. Download the AOMEI Backupper Standard, and launch it.
2. Click on the Backup option from the left menu, then select System Backup.

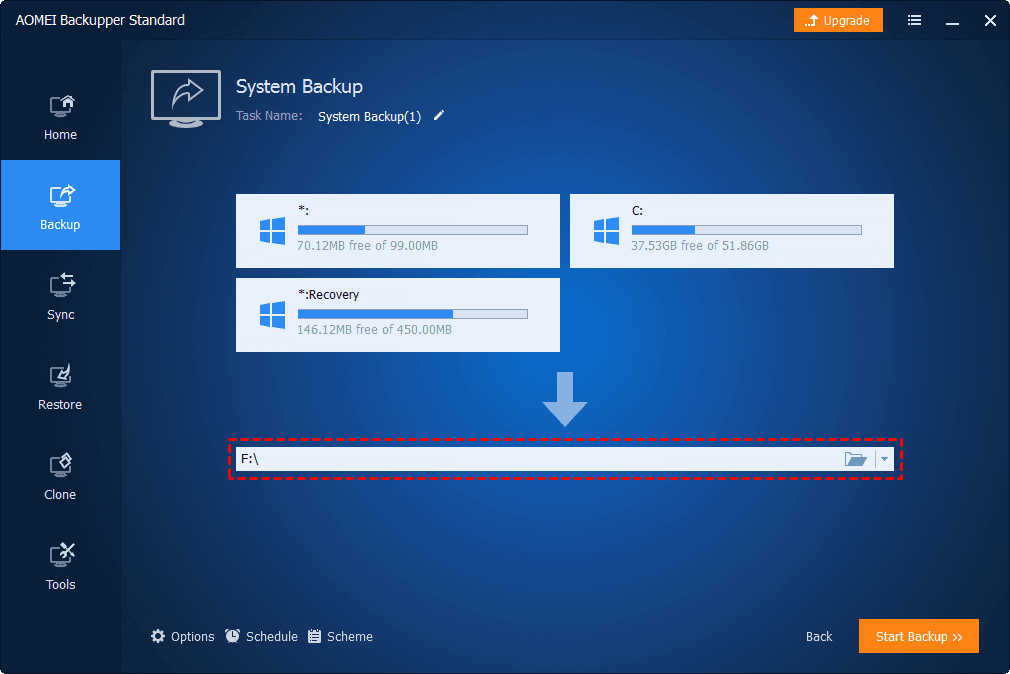
3. Choose the USB flash drive as your backup destination.
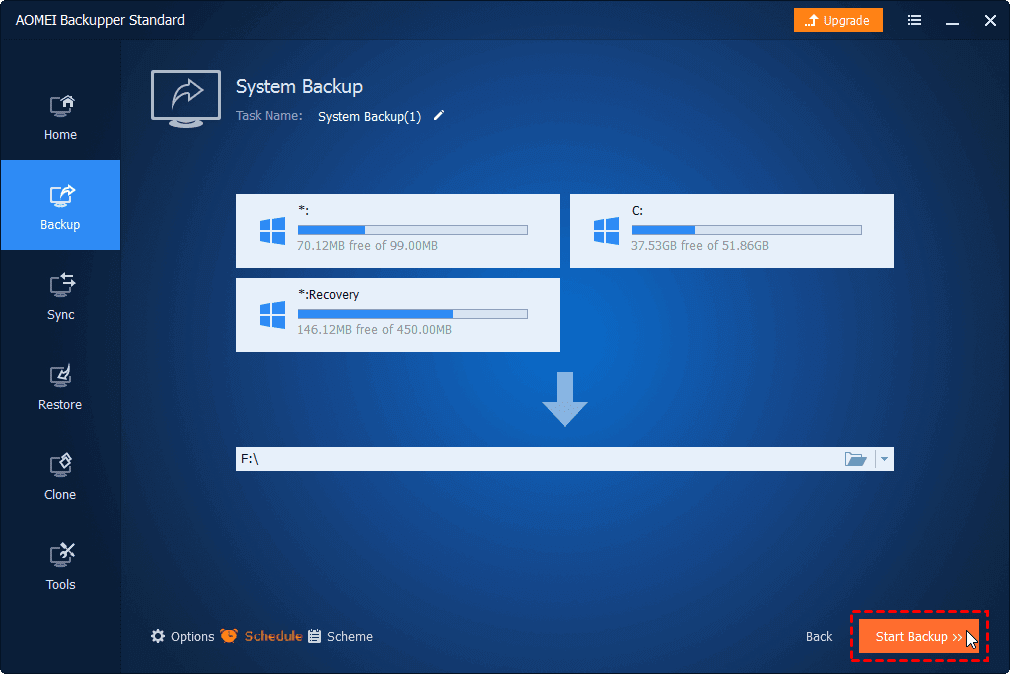
4. Then click on the Start Backup to begin the Windows 10 backup task.
Tip: Best Free Way to Backup Your Computer
To protect data on your computer, you can choose an easy-to-use backup tool for free, like CBackup. It provides professional cloud backup services, more powerful and convenient than Windows built-in tools.
CBackup offers useful features to backup data to mainstream cloud drives such as OneDrive, Dropbox and Google Drive, also its cloud with free 5GB storage space. With the help of CBackup, you can also backup Google Drive to USB or backup other cloud storage.
What’s more, CBackup can perform auto-backup on your Windows PC for free. You can select the backup schedule as daily, weekly, monthly, or a specific time. To make you know the result of backup tasks, CBackup allows you to add email notifications for each task.
Now, let’s see how to backup your computer data with CBackup:
1. Download and set up the CBackup desktop app on your Windows PC. Sign up for an account and run the desktop client to log into your account.
2. Go to the Backup tab, and select the Backup PC to cloud button to create a new Windows 10 backup task.

3. Add your computer files to backup in the Source tab, then select cloud.
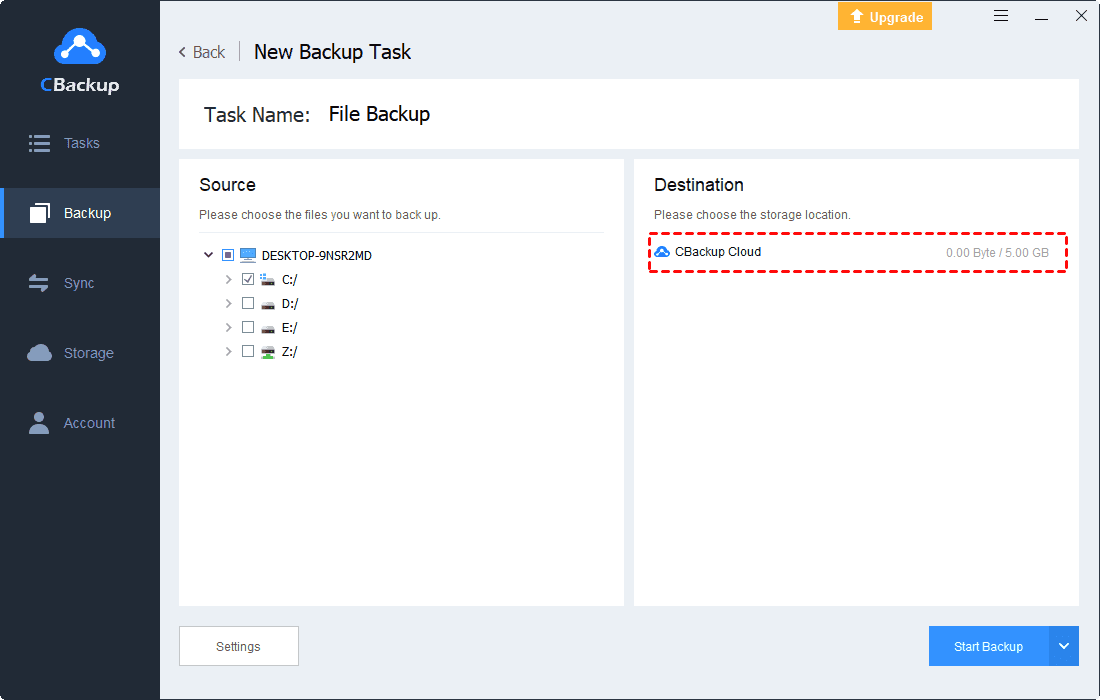
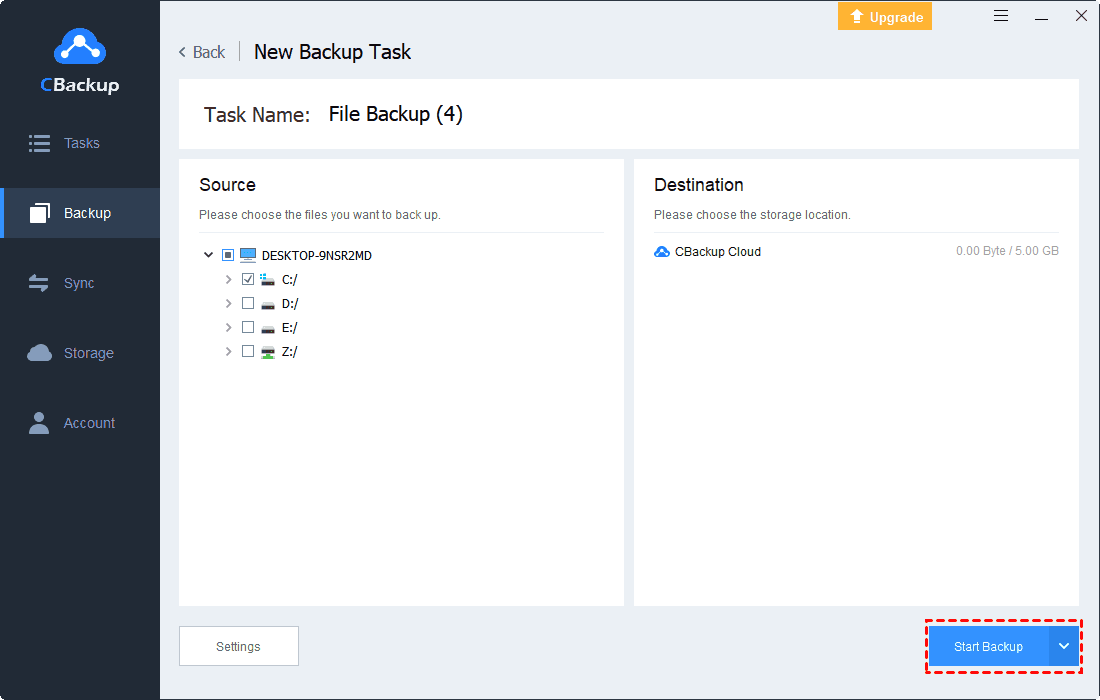
4. Finally, click on the Start Backup button to begin the new Windows 10 backup.
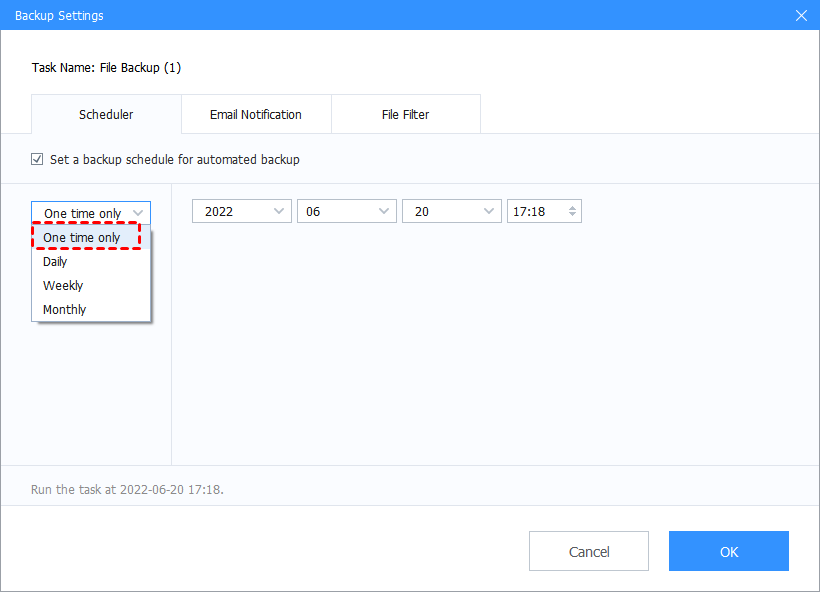
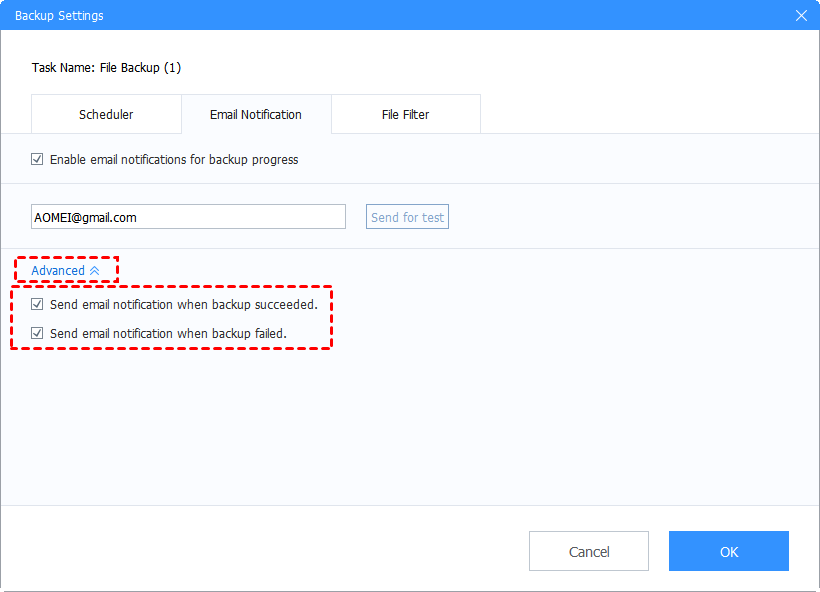
☛ Note: To set up an auto backup task and email notification, you can use the following features.
-
Schedule Backup
CBackup provides 4 different scheduled modes including one time only mode, daily mode, weekly mode, and monthly mode. You can select any one of them according to your need. Then your files will be backed up with a certain frequency automatically.
-
Email Notification
Type in your email address, and you will receive the notification when the backup task is successful/failed.
Final Words
After reading this article, we believe that you have learned different solutions and detailed steps to backup Windows 10 to USB. If you want to protect your data better, we recommend you try a professional cloud backup service like CBackup for free.

Secure & Free
