
Backup Mac to iCloud with Best Online Backup for Mac
This article will show you how to backup Mac to iCloud and FAQ. If you happen to need this, please keep reading below.
by CBACKUP Lasted Updated October 8, 2024
Quick Navigation
Necessity of Backup Mac to iCloud
Like Windows computer, Mac also needs a copy of backup, because you may encounter common threats like Mac Scareware, Lamadai, Coin Thief, system or disk failure, etc. To get rid of these unexpected things, you can backup Mac to iCloud or simple create a local backup. Which one is best for you? Do you need both types of backup?
Speaking of the best online backup for Mac, iCloud deserves it. This software is designed for all Apple products to backup important files on any Apple device and prevent a local and natural disaster. In addition, you can backup the entire Mac with built-in Time Machine, but the backup takes up local space and is easily affected by Mac. If you backup Mac to an external hard drive, your backup may be damaged by disk failure or natural disaster, fire for instance.
In simple words, cloud backup for Macbook Pro and Mac OS X is the best choice when you want to backup data and ensure its security. But if you want to backup the system, you’d better use Time Machine and save the backup on an external disk. According to the 3-2-1 backup strategy, the safest way is to backup Mac with iCloud and Time Machine.
How to Backup Macbook Laptop to iCloud
Next, I’ll briefly introduce you to the steps to backup your Mac. All steps of cloud backup Mac OS X and Macbook are very similar and you can use it as a reference to backup various versions of Mac laptop and desktop.
To backup Macbook to iCloud, use the following steps:
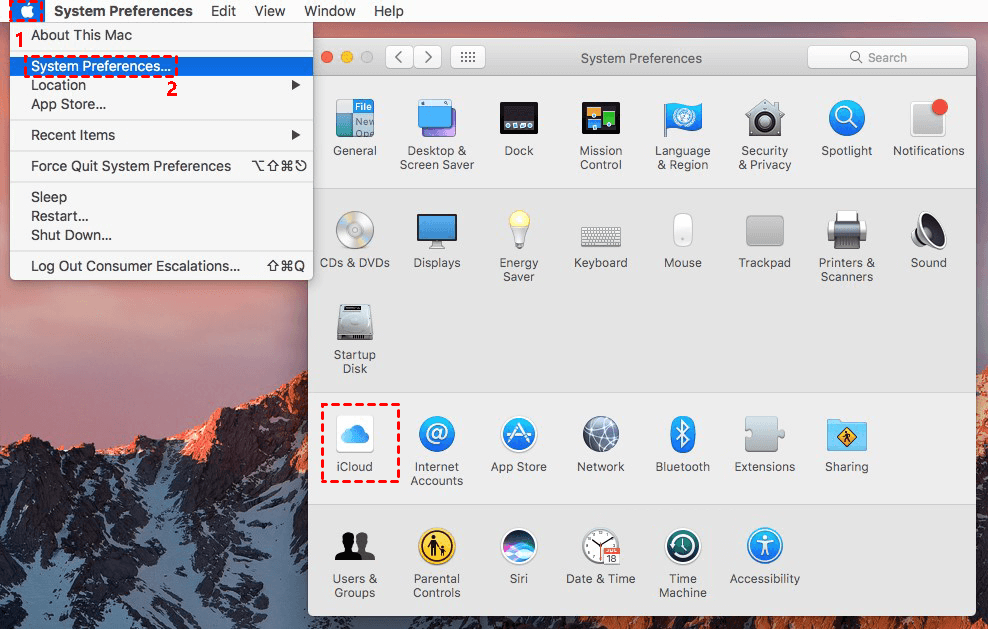
Step 1. Click the Apple menu at the upper left corner of screen and select “System Preferences”, then click “iCloud” in the next window.
Step 2. Type your Apple ID and password to sign in to iCloud if you are using iCloud for the first time. If not, you can skip to next step. During the process, you may need to choose from “Use iCloud for your documents and data” and “Use Find My Mac”, just select and click “Next”.
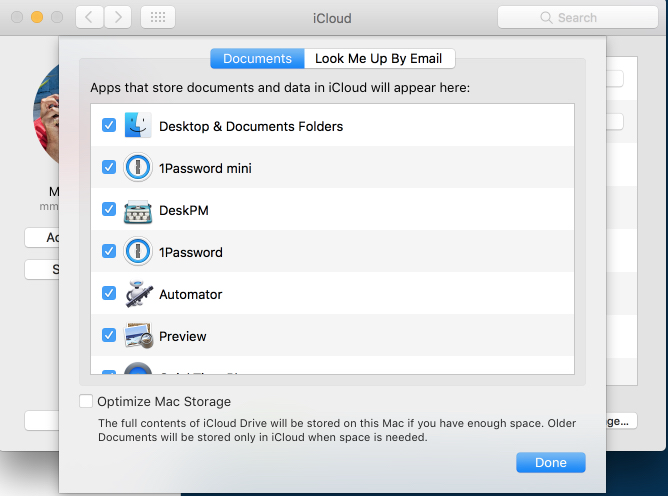
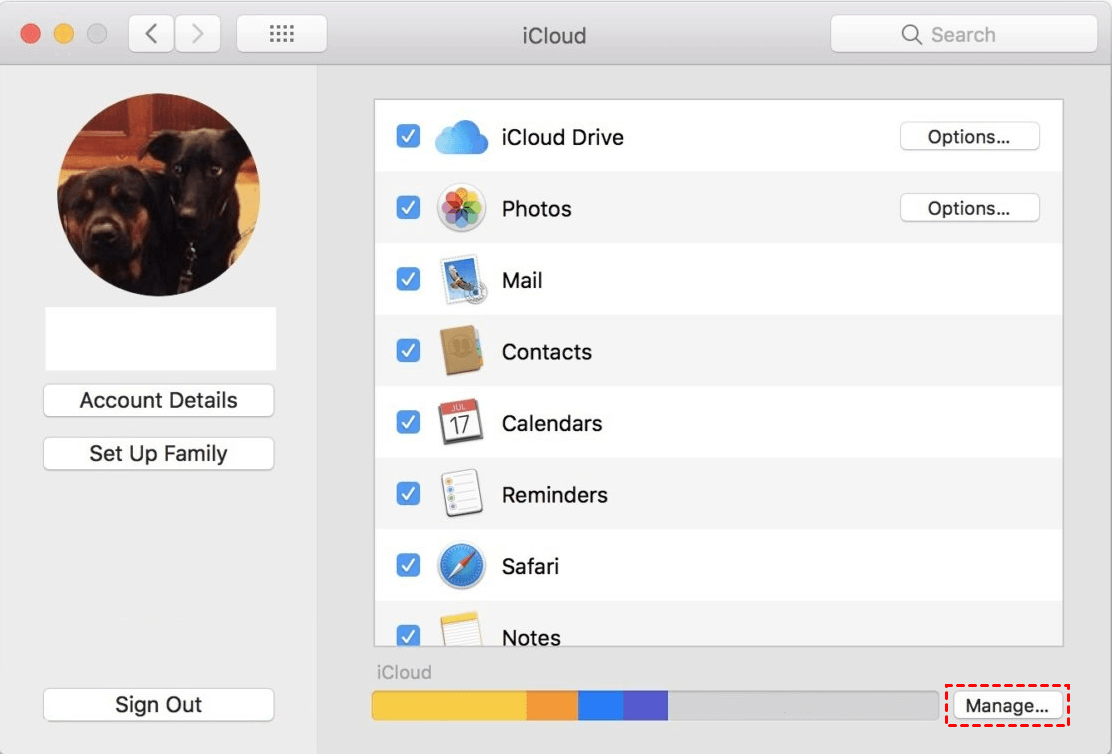
Step 3. Click “Options” at the right side of iCloud Drive, then uncheck the worthless app for you and click “Done”.
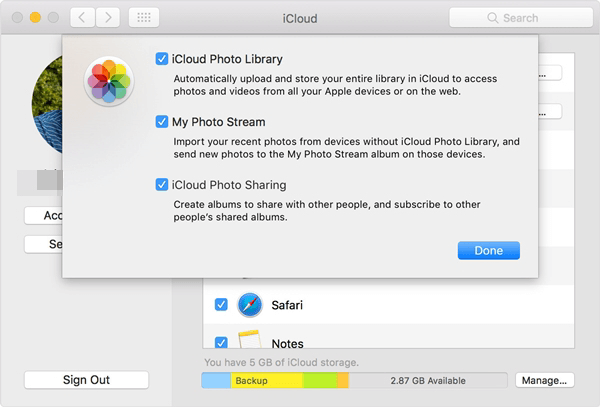
Step 4. To backup photos on mac to iCloud, tick “Options” at the right side of Photos and select “iCloud Photo Library”, “My Photo Stream” or “iCloud Photo Sharing”, then click “Done”.
Step 5. Finally, uncheck other options you don’t need and close the system preferences window, then your data will be automatically uploaded to iCloud and you can access it from any device.
✎Note:
-
All the options in the iCloud are automatically checked by default, so you need to manually uncheck the options or apps you don’t need.
-
iCloud Photo Library and My Photo Stream will backup your photos, but both are different. The previous one will occupy the Apple iCloud storage while the last will not. If your budget is limited, the last one will be a great choice for you. Please remember it only keep your last 1000 photos for 30 days and will not upload videos.
Can I Backup My Entire Mac Computer to iCloud?
From above, you probably know iCloud does not backup entire system for Mac and Time Machine will do this. All you need is an external storage device, such as, external hard drive, USB flash drive, and more. In addition, this software will store local snapshots on disks with enough space to prevent disk failure.
To backup entire Mac computer with Time Machine:
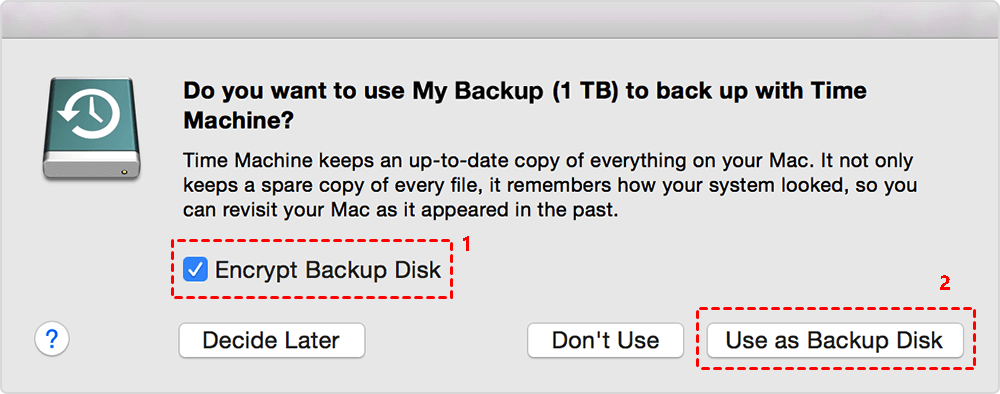
Step 1. Connect external hard drive to your Macbook or iMac, and make sure it can be detected. Then, you may be asked if you want to use it with Time Machine, simply tick “Encrypt Backup Disk” and tap on “Use as Backup Disk”. If not, please go to system preferences and open “Time Machine”.
Step 3. Click “Select Backup Disk” (also called “Select Disk” or “Add or Remove Backup Disk” ) at the right panel, then tap on the connected disk and “Use Disk” in order.
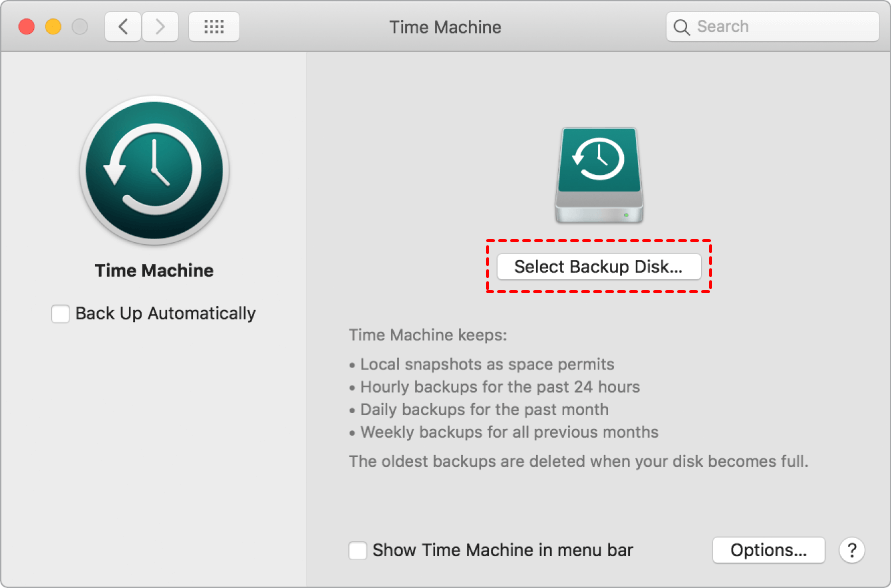
Step 4. Click “Show Time Machine in menu bar” to add quick access on your Mac.
Step 5. Click “Options” at the lower right corner, and select “Back up while on battery power” and “Notify after old backups are deleted”.
Step 6. At last, tick “Back Up Automatically” and close this window. Then this software will start to backup your files hourly, daily, weekly.
✎Note:
-
If you want to manually backup the system, you can directly click the Time Machine icon and select “Back Up Now”.
-
If you are using MacBook, the automatic backup requires a power adapter connected..
FAQ: How to Manage iCloud Storage
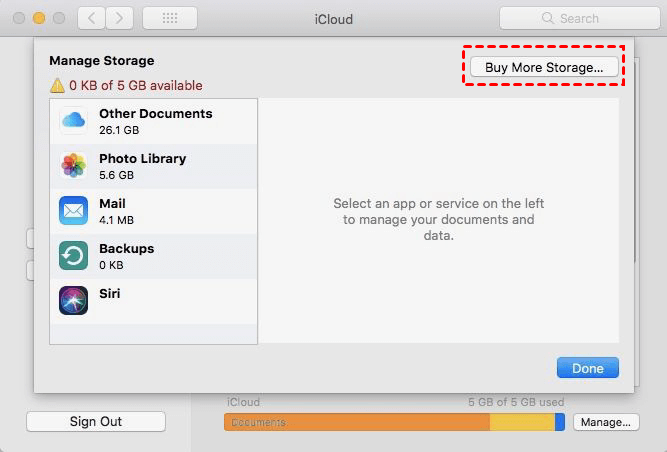
Every Apple ID only has 5GB space free of charge and it will run out in the near future. At this moment, you can try to manage the iCloud storage first and the last sort is to buy extra cloud storage.
Step 1: To manage iCloud storage, please go to “System Preferences” > “iCloud” > “iCloud Drive”, then click “Manage” at the lower right corner. Then, you will get the usage of cloud storage and turn off the data you no longer need.
Step 2: To disable “Desktop & Documents Folders” on Macs and save space of iCloud, go to “System Preferences” > “iCloud” > “iCloud Drive”, then click the “Options” button and uncheck this option.
Step 3: To disable iCloud Photo Library, go to “System Preferences” > “iCloud” > “Photos”, uncheck “iCloud Photo Library” and keep “My Photo Stream” as instead.
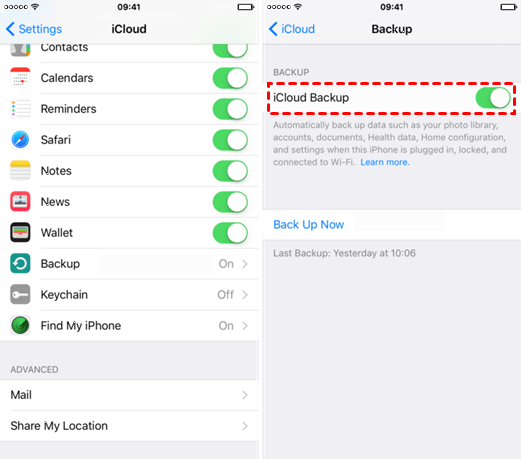
Step 4: To turn off backup from all iPhone, iPod, iPad, go to “Settings” > “Your Apple ID” > “iCloud” > “Backup”, then turn off “iCloud Backup” by clicking the button.
Step 5: To get more space from iCloud, open “iCloud” from system preferences, click “Manage” and “Buy More Storage”, then follow the on-screen instructions.
While many people think iCloud is the best cloud backup for Mac, iCloud's free storage is relatively tight, how can users with inadequate budgets protect more data? You can continue reading the following to find out.
Workaround: Backup Mac to Google Drive instead of iCloud
Compared with iCloud, Google Drive provides more free cloud storage and every user has 15GB of space. If your iCloud Drive does not have enough space, you can use Google Drive as a replacement.
To backup Mac to Google Drive, just follow the steps below:
Step 1. Download and install the Google Drive desktop app - Drive for desktop on your Mac.
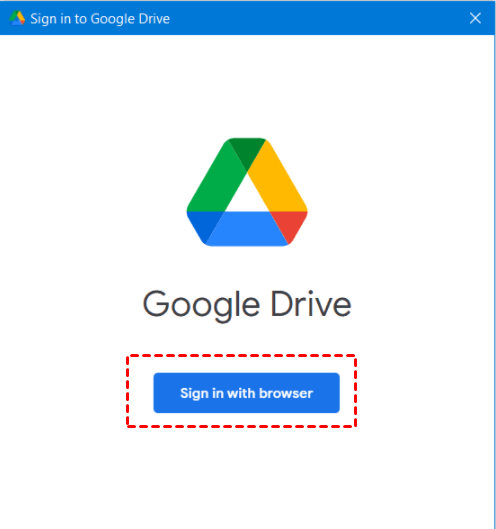
Step 2. Click Sign in with browser to log in to your Google Drive account.
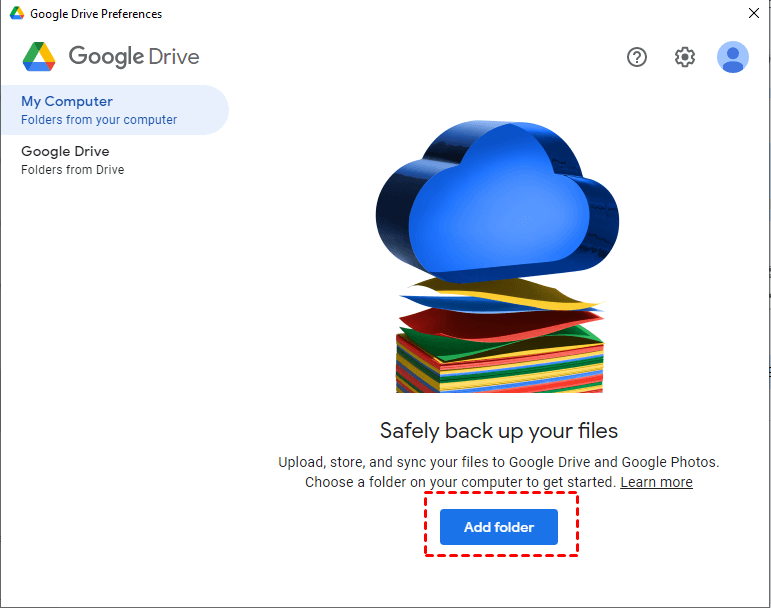
Step 3. Next, you can click Add folder on the My Computer page to choose Mac files that need to be backed up to Google Drive.
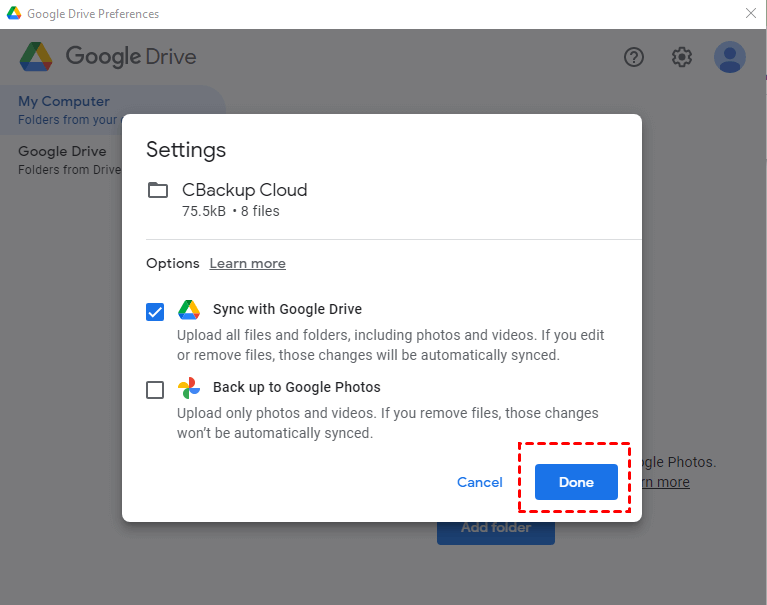
Step 4. Check Sync with Google Drive, then click Next to confirm.
Step 5. Now, the application will backup Mac with Google Drive. And you could copy the data you want to backup on Mac and paste it to the Google Drive disk/folder. Then, it will automatically sync to your Google Drive account as well.
Final Thoughts
Backing up Mac to iCloud is a very common need for users who are using Mac desktop or laptop. If you don’t want to pay for iCloud storage, you’d better turn off iCloud Photo Library and Desktop & Documents Folders, because it occupies too much space on your iCloud. Also, you can use other cloud storage as alternative, such as Google Drive, Dropbox, OneDrive, and more.

Secure & Free
