
Ultimate Guide to Apple iCloud Storage
This article will show you everything related to Apple iCloud storage. If you have any doubt, please keep reading below to learn more.
by CBACKUP Lasted Updated February 1, 2023
Apple iCloud Storage Options
Nowdays, cloud storage has been integrated into all Apple products, from Macs to iPads, iPhones and even Apple TV. It’s the total amount of storage available on iCloud and every Apple ID has 5GB free Apple cloud storage. And the space is shared with its 4 principle elements, including iCloud Backup, iCloud Drive, iCloud Mail and iCloud Photo Library.
In the following, I’ll briefly introduce these elements to make you understand better.
iCloud Backup: It’s a feature used to backup documents, photos and videos on iPhone, iPads and iPods to iCloud.
iCloud Drive: iCloud Drive is a app like Dropbox, OneDrive, Google Drive that can be used to sync or share files, but it greatly integrates with Apple products. You can install on Macs, iPhones and iPads.
iCloud Mail: This storage is for all the emails and attachments connected to your iCloud account.
iCloud Photo Library: This element upload and store all your photos and videos just like iCloud Backup, but iCloud Photo Library allows you to access and view your data. iCloud Backup only can be used to restore your entire iPhone.
Apple iCloud Plans and Storage Price
In iCloud, you have four choices: 5GB free; 50GB for $0.99/month; 200GB for $2.99/month; and 2TB for $9.99/month. Which plan should you choose? Here are some suggestions and you can use as a reference.
For free plan: you only have on iPhone and don’t use many iCloud features, or you already purchase storage from other online backup service provider, such as, Google Drive, OneDrive, Dropbox
For 50GB plan: you have a reasonable amount of image and videos on your iPhone or iPad
For 200GB plan: you have a reasonable amount of image and videos on your iPhone or iPad need to be backed up
For 2TB plan: you and your family member are using Apple devices and want to use iCloud services flexibly. And more, 200GB plan and 2TB plan can be shared with family member.
How does Apple iCloud Storage Work?
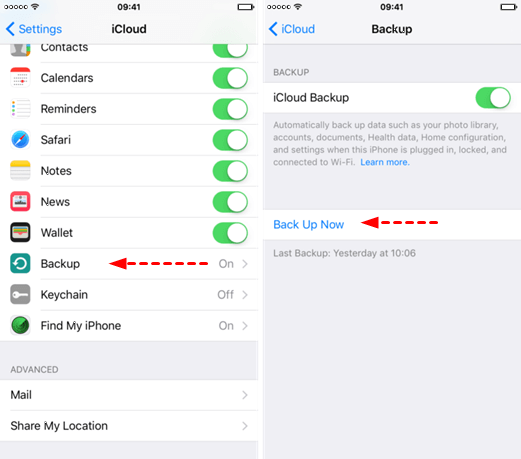
Step 1. Unlock your iPhone and connect it to Wi-Fi.
Step 2. Go to “Settings” > “your iPhone name” > “iCloud” > “Backup” and turn on "iCloud Backup" in the next window, then click “Back Up Now” to start iCloud backup on iPhone.
Notes:
-
If you want to check your backup, navigate to “Settings” > “your iPhone name” > “iCloud” > “Manage Storage” and select your device. Then, you will see the latest backup.
-
If you want to automatically backup iPhone 7/8/X/XS/XR, you need to make sure that your iPhone is connected to Wi-Fi, power source and locked. Also, enough space is required.
How to Share Apple iCloud Storage with Family?
Before you start Apple iCloud storage family sharing, you need to ensure your phone is iOS11 or later. And it will be better if your family member has iOS11 or later version.
Step 1. Go to “Settings” > “your iPhone name”.
Step 2. Click “Set Up Family Sharing” and “Get Started” subsequently.
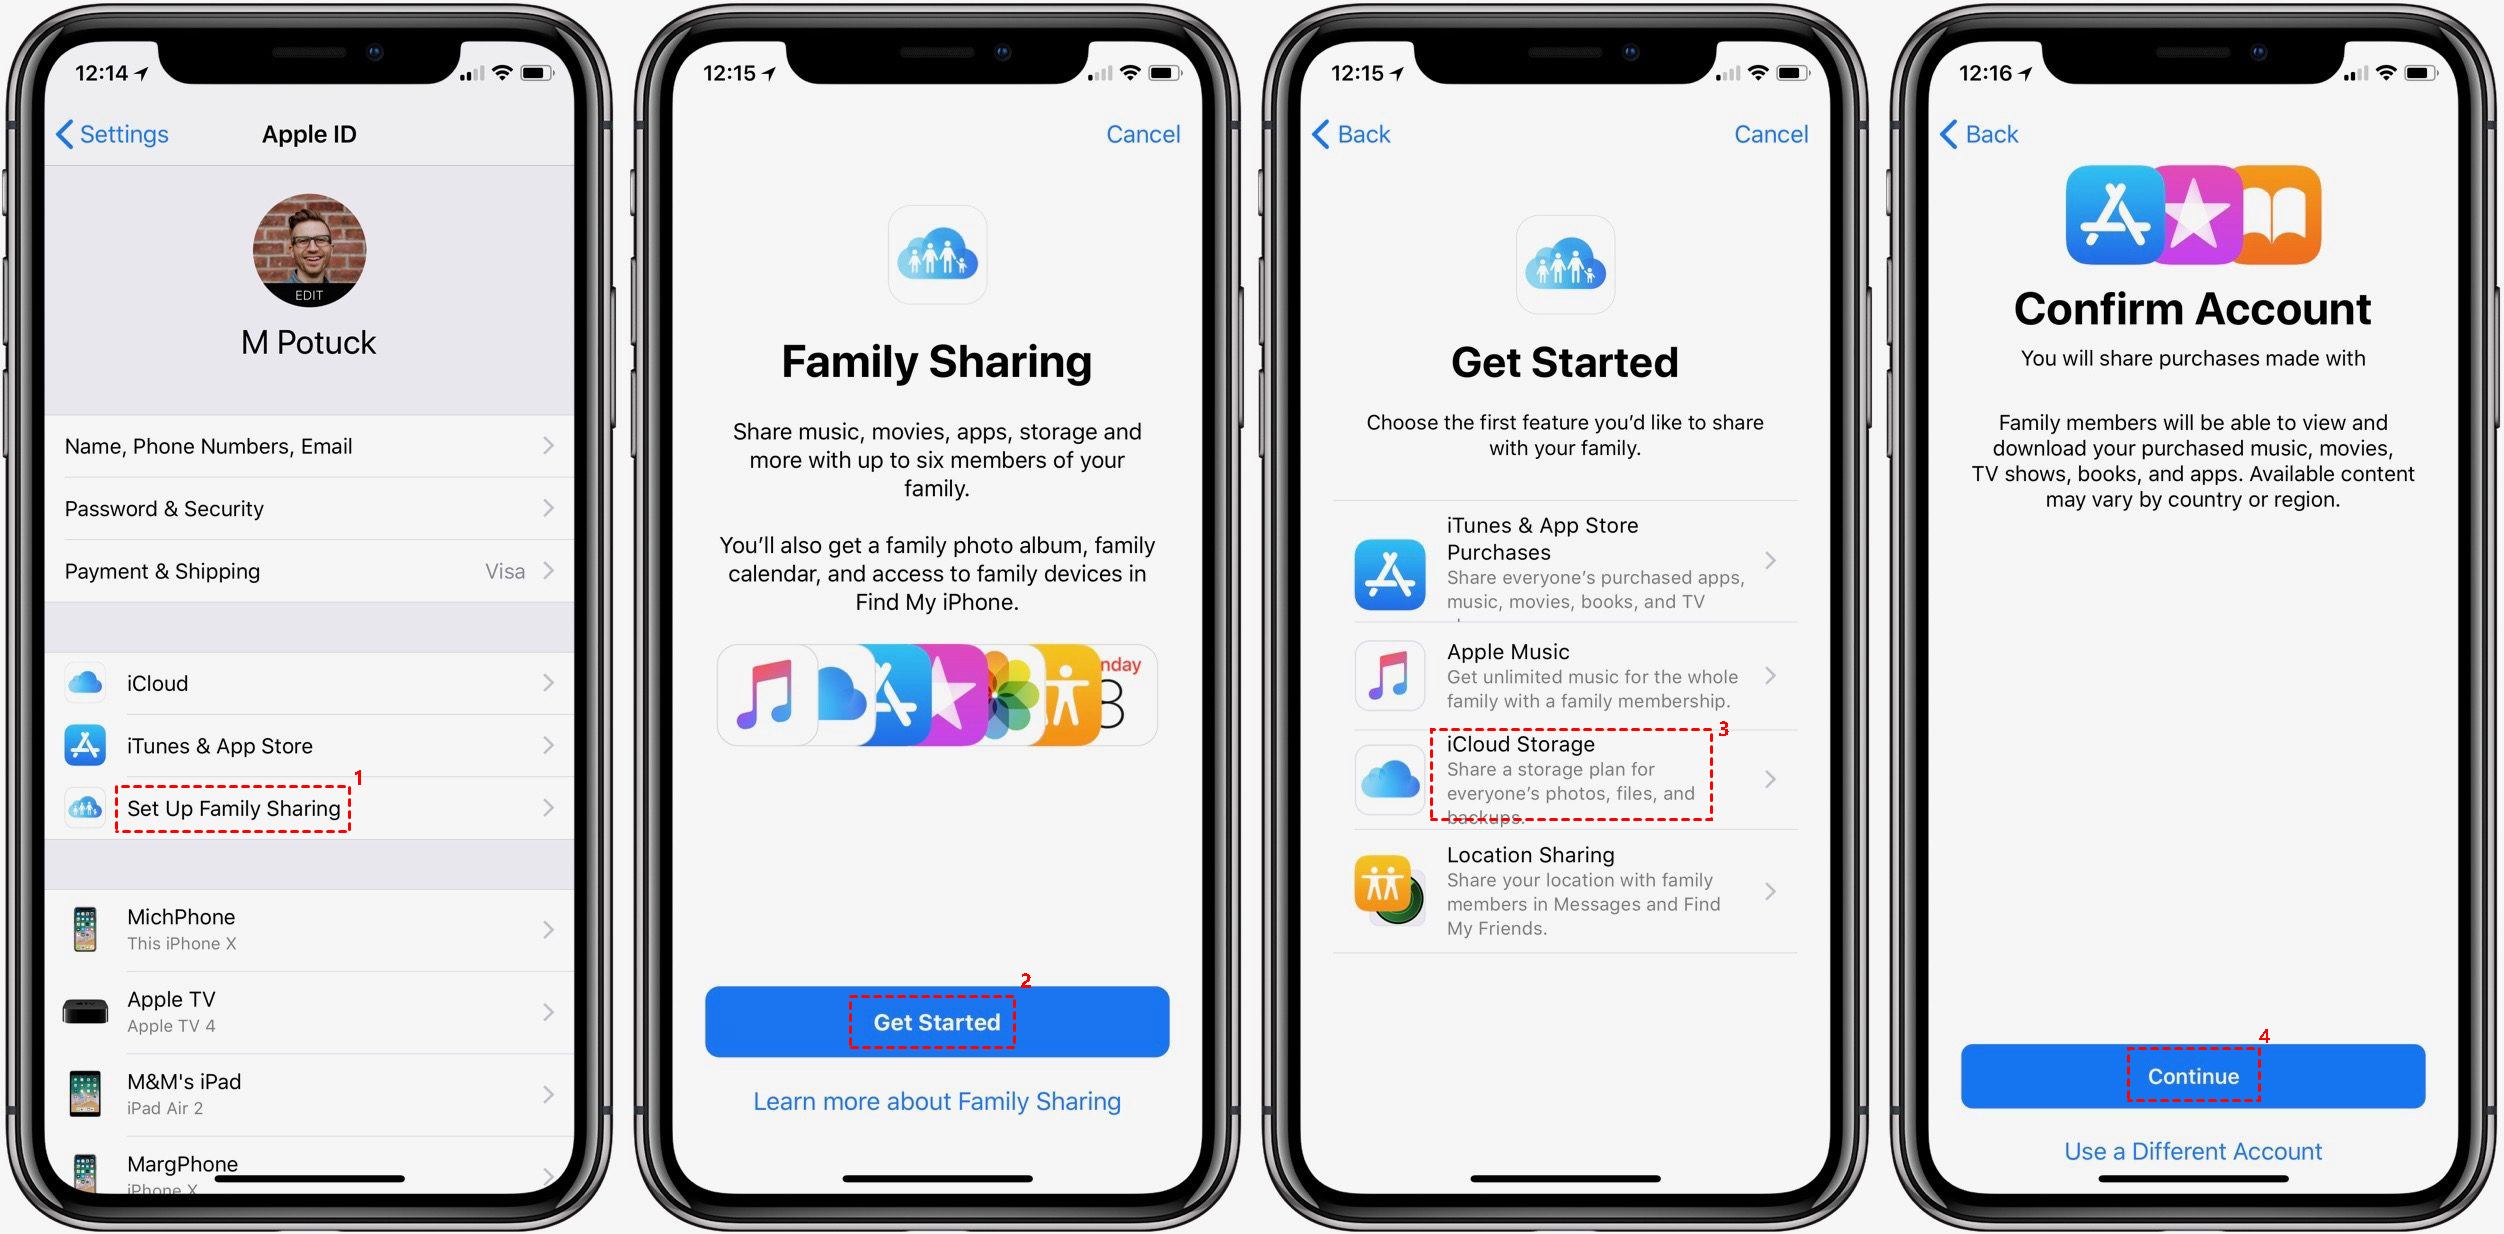
Step 3. Select “iCloud Storage” as the first feature to share with your family.
Step 4. Click “Continue” and follow the on-screen instructions until you see “Invite Family Members”, then add the one who already have Apple ID.
How to Access and Manage Apple iCloud Storage?
After getting a new iPhone or other Apple devices, you may want to everything related to Apple iCloud storage. Here, I’ll explain the most common issues.
For how much space you are using, you can go to “Settings” > “your iPhone name” > “iCloud”, then you will see the used space or all your iCloud space.
To simply backup specific apps, you can go to “Settings” > “your iPhone name” > “iCloud” > “Manage Storage” > “Backups”, select the device you are using and turn off the apps you don’t want to backup, tap on “Turn off & Delete”.
To delete documents & data in iCloud drive, you can navigate to “Settings” > “your iPhone name” > “iCloud” > “Manage Storage”, scroll down to “iCloud Drive” and select single files or delete or delete all data by clicking “Delete Document & Data”.
To delete photos: you can navigate to “Settings” > “your iPhone name” > “iCloud” > “Manage Storage”, scroll down to “Photos” and delete all or parts photos in the next window.
To disable “Desktop & Documents Folders” on Macs and save space of iCloud, you can go to “System Preferences” > “iCloud” > “iCloud Drive”, then click the “Options” button and uncheck this option.
To buy more Apple cloud storage, you can go to “Settings” > “your iPhone name” > “iCloud” > “Manage Storage”, tap on “Change Storage Plan” and select the proper plan, then click “Buy”, type your password and click “OK” to confirm.
Not Enough Space on iCloud and Store Your Files Elsewhere
When you receive “This iPhone cannot be backed up because there is not enough iCloud storage available” or similar error messages, you have many choices, not only free up space on Apple iCloud storage or upgrade. For example, you can save your photos on Mac via “My Photo Stream”, or use different cloud storage.
Method 1: Backup Photos to Computer using My Photo Stream
“My Photo Stream” does not occupy the iCloud storage space, and if you turn on this feature on both iPhone and your computer, your photos will be automatically downloaded to your computer when your iPhone is connected to Wi-Fi. However, you need to remember that it will only retain photos for 30 days and it does not sync videos.
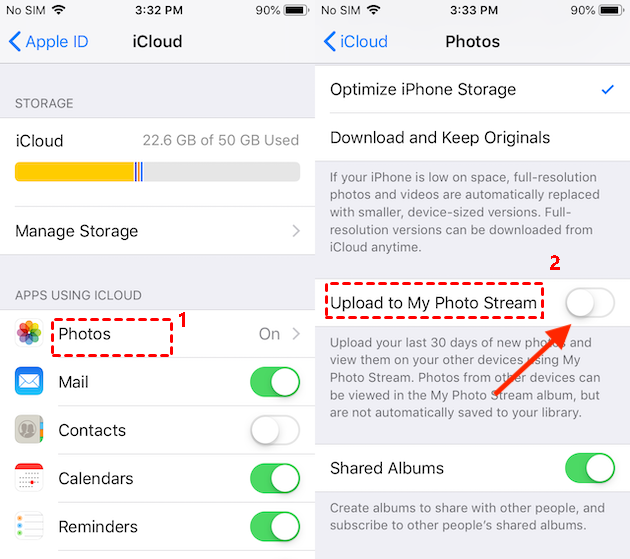
To turn on “My Photo Stream” on iPhone:
Go to “Settings” > “your iPhone name” > “iCloud” > “Photos” and turn on “Upload to My Photo Stream”.
To enable “My Photo Stream” on Mac:
Open the Photos app, click “Photos”, then select “Preferences” and “iCloud”, and finally check “My Photo Stream”.
Method 2: Backup iPhone to Google Drive instead of iCloud
Also, if you have personal cloud storage like Google Drive, Dropbox, OneDrive, you could consider using its mobile app.
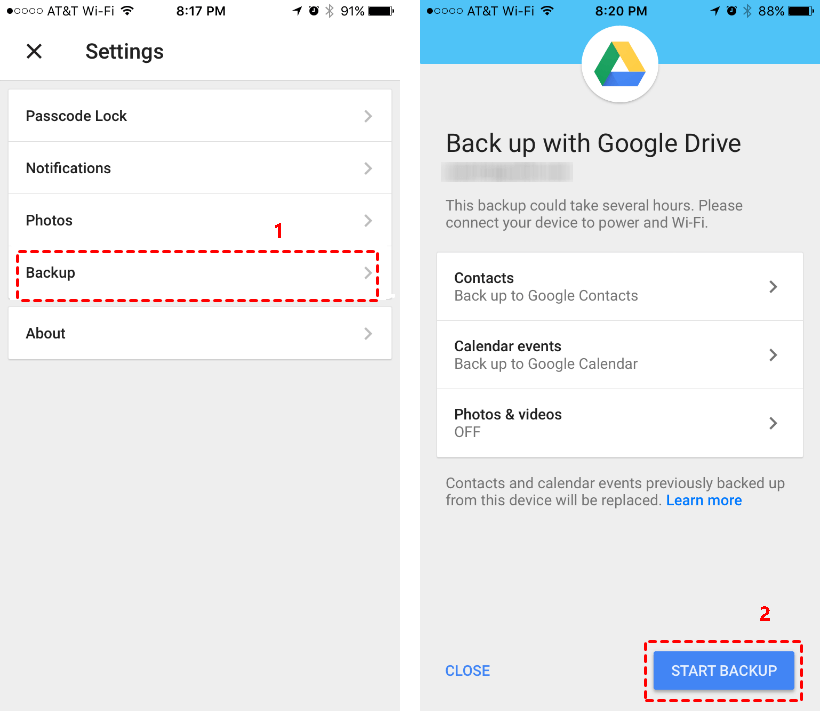
Step 1. Download the latest version of Google Drive on your device and log in with your account.
Step 2. Click the 3 lines at the upper left, then tap on the “Settings” icon.
Step 3. Click the “Backup” link and “START BACKUP” to start the process.
Note: If you want to fully make use of free space on all your cloud disks, you could consider using CBackup. You just need to connect all your cloud storage and it will combine all cloud storage into one automatically.
Tip: Get Unlimited Free Cloud Storage Space
If your public cloud drives don't have enough storage space to store your data on Apple devices, you could use the free cloud backup service - CBackup to merging unlimited cloud drives to generate a huge cloud storage space. Here we will show you how to combine multiple cloud drives as follows:
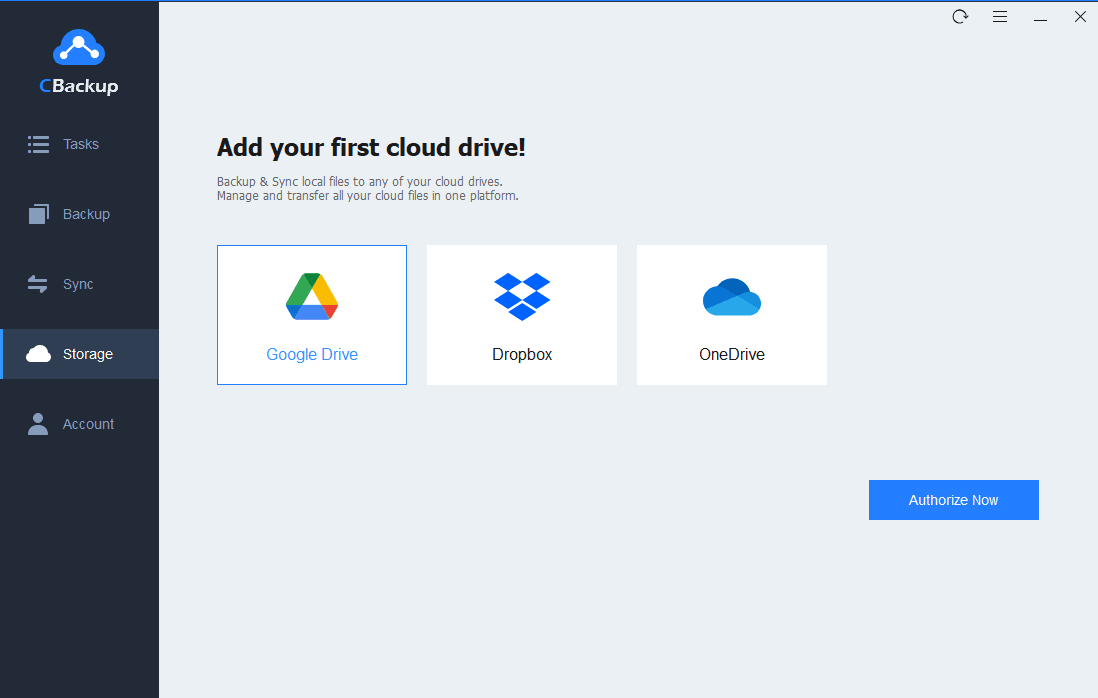
1. Please download CBackup desktop app and then create a new CBackup account, then log in.
2. Click Storage > Google Drive > Authorize Now, then follow the steps to grant CBackup access to your Google Drive account. Then repeat step 2 to add other Google Drive accounts or other clouds, like Dropbox, OneDrive, etc.
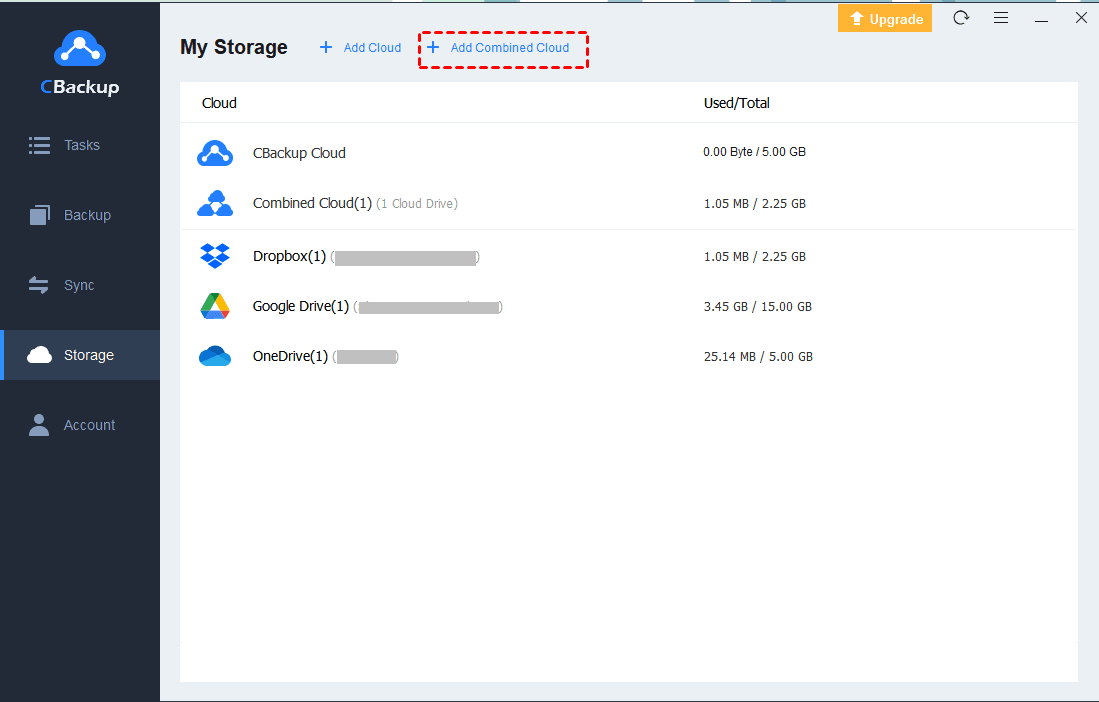
3. Hit Storage > Add Combined Cloud.
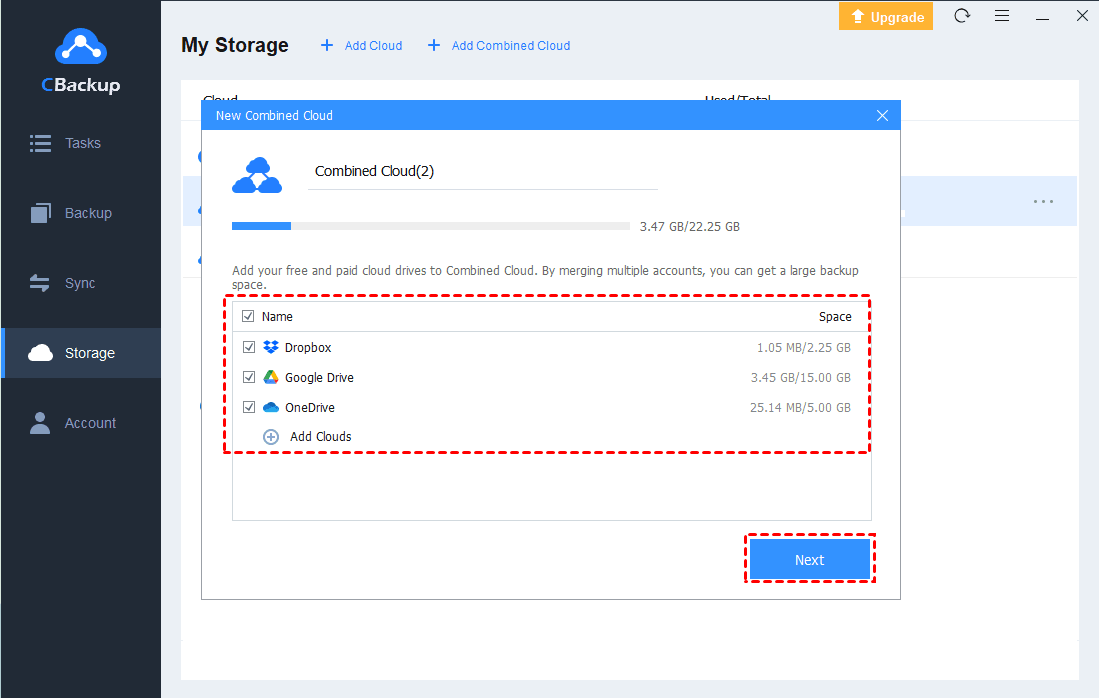
4. Then, tick all the cloud drives that you added before, then press Next. Choose the order for these cloud drives to store files, then click Combine.
Wrapping Things Up
That’s all for Apple iCloud Storage. Each Apple ID only has 5GB space free of charge, and when there is not enough space, you can free up space on iCloud, upgrade to proper Apple iCloud plan, backup to My Photo Stream or online cloud storage. For details, go back to above.

Secure & Free
