
How to Sync Photos from Google Photos to Google Drive
Need to know how to sync photos from Google Photos to Google Drive? Google no longer offers automatic sync, but you can still move your photos using manual steps, Google Takeout, or cloud transfer tools. This guide explains the easiest ways to sync your images and keep your photo storage organized across both Google services.
by CBACKUP Lasted Updated June 25, 2025
Can You Still Sync Google Photos with Google Drive?
Google discontinued the automatic sync between Google Photos and Google Drive in July 2019 to reduce confusion and prevent duplicate files. Many users found it unclear which app controlled their media, and changes in one platform often caused unexpected results in the other, like deleting a photo in Drive unintentionally removing it from Photos. To simplify the experience and improve clarity, Google separated the two services.
What Impact Did This Have on Users?
The end of automatic sync brought several key changes for users, including the following key impacts:
- No More Automatic Sync: New photos added to Google Photos no longer show up in Drive folders.
- Manual Transfers Required: Users must now download photos and upload them to Drive, or use tools like Google Takeout or cloud transfer services.
- More Control, but Less Convenience: While the separation avoids accidental deletions, it also adds extra steps for users managing media across both platforms.
Do You Still Need to Sync Google Photos to Google Drive?
That depends on your needs:
✅ Yes, if you use Google Drive for backups or organization. Keeping photos in Drive helps integrate them with Docs, Slides, or third-party apps.
✅ Yes, if you want centralized storage. Drive supports custom folders and file naming, which some users prefer over Google Photos’ timeline-based view.
❎ No, if you’re satisfied using Google Photos as your main media library. Photos now operates independently with its own backup and sharing features.
If you need to sync photos from Google Photos to Google Drive, there are proven methods and tools available to help you transfer and manage your images efficiently across both platforms.
Method 1. How to Sync Photos to Google Drive by Downloading and Uploading
One of the effective ways to sync photos with Google Drive is to download them from Google Photos and upload pictures to Google Drive manually. This straightforward method gives you full control over which images to transfer and works on any device without requiring third-party sync tools. It suits one-time or occasional transfers of selected photos or albums. Since this method lacks automatic syncing, you must repeat the process each time you want to sync photos to Google Drive. The process can be time-consuming and needs enough storage on your device to hold downloaded files before uploading.
Organizing photos manually in Google Drive is also necessary because it does not offer the automatic sorting features found in Google Photos. This reliable and simple method works best for users with smaller photo libraries or those who prefer not to use third-party sync tools.
💡 Since the Google Backup and Sync photos feature no longer works, follow these steps to transfer your photos between Google Photos and Google Drive:
Step 1. Open Google Photos on your device or browser and select the photos or albums you want to sync.
Step 2. Download the selected photos to your device by clicking the download button or using the save option on mobile.

Step 3. Open Google Drive on your device or browser.
Step 4. Upload the downloaded photos to Google Drive by selecting the upload option and choosing the files from your device.
Step 5. Organize the uploaded photos into folders within Google Drive for easier access and management.
- ★Tips:
- If you experience slow uploading speeds to Google Drive, try using CBackup to upload photos to Google Drive faster and more conveniently with just a few simple steps. Click to learn how to use it: >> How to Backup Google Photos to Google Drive Effortlessly
Method 2. How to Sync Photos from Google Photos to Google Drive Using Google Takeout
To back up Google Photos to Google Drive, Google Takeout provides a simple and efficient solution. This method is perfect for transferring your entire photo library without using your device’s storage. Visit the Google Takeout website and select Google Photos as the data to export. Next, choose Google Drive as the export destination and customize file formats and delivery options if needed. Once confirmed, Google creates an archive of your photos and saves it in organized folders within Google Drive. The process can take some time, depending on the size of your photo collection, but it requires minimal effort.
Note that this method does not support automatic syncing, so you will need to repeat the export whenever you want to update your Drive with new photos.
💡 If you want to learn how to sync Google Photos to Google Drive efficiently, follow these simple steps:
Step 1. Visit the Google Takeout website and sign in to your Google account.
Step 2. Select only Google Photos from the list of available Google services.
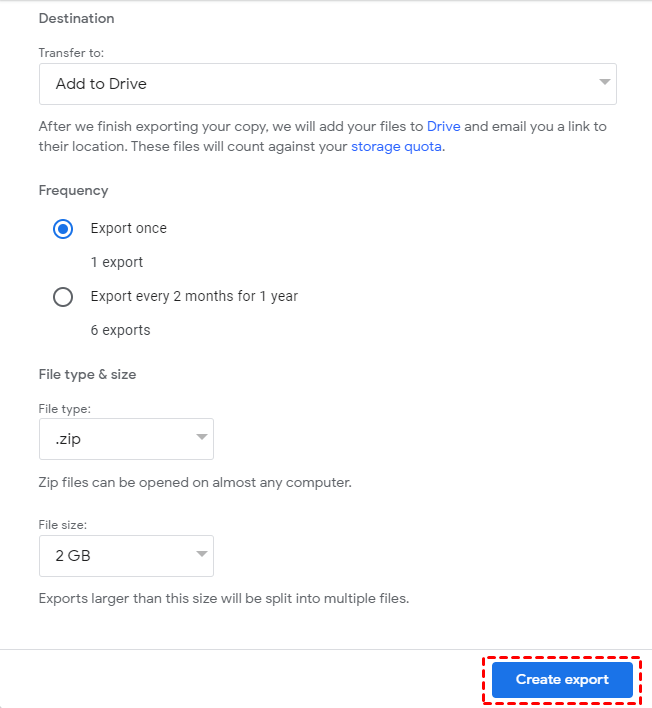
Step 3. Click Next step, then choose Add to Drive as the delivery method.
Step 4. Customize the file type, archive size, and export frequency if needed, then click Create export.
Step 5. Wait for Google to prepare your archive; once ready, your photos will appear in a new folder in Google Drive.
Method 3. How to Sync Photos with Google Drive Using a Third-Party Tool
If you want an easier way to sync photos to Google Photos and Google Drive without manual downloads, third-party cloud management tools offer a practical solution. One popular option is MultCloud, which allows you to connect multiple cloud accounts and sync photos with Google Photos and Google Drive directly in the cloud.
With MultCloud, you can link your Google Photos and Google Drive accounts, then create one-way or two-way sync tasks to keep your photos updated automatically. The tool supports scheduled syncing, saving time and effort for users with large photo libraries or those who need frequent transfers.
💡 To understand how to sync Google Photos with Google Drive easily, follow these step-by-step instructions:
Step 1. Go to the MultCloud website and create a free account.
Step 2. Log in and add your Google Photos and Google Drive accounts by granting the necessary permissions.
Step 3. Navigate to the “Cloud Sync” feature in MultCloud’s dashboard.
Step 4. Select Google Photos as the source and Google Drive as the destination for syncing photos.
Step 5. Choose the sync mode (one-way or two-way) and set a schedule if desired, then click “Sync Now” to start the process.
Bonus Tip: How to Backup Google Photos to Google Drive Effortlessly
Although you still need to download photos manually from Google Photos, using a tool like CBackup can make uploading and managing those photos in Google Drive much easier. CBackup offers faster and more stable upload speeds compared to the standard Google Drive interface, saving you time during large transfers. It also provides features like batch uploads, scheduled backups, and cloud storage management, helping you keep your photos organized and secure.
With CBackup, you get better control over your backups, reduce upload interruptions, and simplify photo management—all with just a few clicks. This makes it an excellent choice for anyone looking to back up Google Photos to Google Drive more efficiently.
💡 Here is how to backup Google Photos to Google Drive using CBackup:
Step 1. Go to www.cbackup.com, sign up for a free account, and install the CBackup desktop app.
Step 2. Open the app, log in, and go to Storage, select Google Drive, and authorize access.
Step 3. Click the Backup tab and choose "Backup PC to Public Cloud".
Step 4. Select the photos stored on your computer as the backup source and choose Google Drive as the destination.
Step 5. Click Start Backup to begin the upload, and optionally set a schedule to automate future backups.
Conclusion
Knowing how to sync photos to Google Drive from Google Photos helps you manage and protect your photo library more effectively. Although Google no longer offers automatic syncing, you can still transfer your photos using manual upload, Google Takeout, or third-party tools like MultCloud and CBackup. These methods let you choose what to sync, schedule backups, and organize files with ease. Whether you need a one-time transfer or regular updates, there is a solution that fits your needs. Select the method that works best for your situation and keep your photos safely stored in Google Drive.
FAQs About Google Photos and Google Drive
If you still have questions about syncing your photos, the FAQs below cover common concerns and provide clear answers on how to sync photos to Google Drive effectively.
1. How to Make a Choice Between Google Drive and Google Photos?
Choosing between Google Drive and Google Photos depends on how you want to store and manage your pictures. Google Photos is built for photos and videos, offering features like auto-sorting, facial recognition, and built-in editing. Google Drive is a general storage platform, better for organizing mixed file types in custom folders.
Here’s a quick comparison:
| Feature | Google Photos | Google Drive |
| Focus | Media storage | All file types |
| Organization | Auto-sorting by date, face, location | Manual folders |
| Editing | Built-in photo tools | None |
| Sharing | Easy album sharing | Standard file sharing |
| Storage | Counts toward Google storage | Counts toward Google storage |
How to Decide:
Use Google Photos if you want a photo-first experience with smart features and easy viewing. Choose Google Drive if you need manual control, folder organization, or want to store other file types along with your photos. For full flexibility, use both together.
2. How to Download Photos from Google Photos to a Laptop?
To download photos from Google Photos to your laptop, follow these simple steps:
- 1. Go to photos.google.com and sign in with your Google account.
- 2. Browse and select the photo(s) or album(s) you want to download.
- 3. To select multiple photos, hold down the Shift key and click.
- 4. Click the three-dot menu (⋮) in the top-right corner.
- 5. Choose Download.
- 6. The selected photos will be downloaded as a ZIP file if you choose multiple items.
- 7. Locate the downloaded file in your Downloads folder and extract it if needed.
3. How to Sync Photos to Google Photos from iPhone?
To sync photos to Google Photos from your iPhone, follow these steps:
- 1. Download and install the Google Photos app from the App Store.
- 2. Open the app and sign in with your Google account.
- 3. Tap your profile icon in the top right corner.
- 4. Go to Google Photos settings > Backup.
- 5. Turn on Backup and choose your desired settings, such as photo quality and folders to back up.

Secure & Free
