
The Best Way to Backup Files on Windows 11
Explore the top 5 methods along with step-by-step instructions and common concerns addressed to find the best way to backup files on Windows 11!
by CBACKUP Lasted Updated June 6, 2025
What is The Best Way to Back Up Files on Windows 11?
Backing up files on Windows 11 is more important than ever. With so many backup methods and tools to choose from, it’s crucial to find a solution that fits your needs while offering security and ease of use. Wondering what the best way is to back up files on Windows 11 today? Keep reading — we’ll guide you to the right choice!
Top 5: The Best Ways to Backup Windows 11 Files
Below are the five best ways to back up files in Windows 11:
Way 1. Backup and Restore (Windows 7)
Despite being an older feature, Backup and Restore from Windows 7 remains a viable option for users to back up Windows 11 files and recover. It offers straightforward backup and restoration capabilities, making it suitable for basic file backups.
With Backup and Restore, users can create system images and backup copies of important files, allowing for easy recovery in the event of data loss or system failure. While it may lack some of the advanced features in newer backup solutions, its simplicity and reliability make it a preferred choice for many users.
Step 1: Open Control Panel by searching for it in the Start menu.
Step 2: In Control Panel, go to "System and Security."
Step 3: Under System and Security, click on "Backup and Restore (Windows 7)."
Step 4: Click on "Set up backup" and follow the wizard to choose where you want to save your backup (an external drive is recommended).
Step 5: Select the files and folders you want to backup, or choose the option to let Windows choose.
Step 6: Click "Next" and then "Save settings and run backup" to initiate the backup process.
Way 2. File History
File History is a built-in feature in Windows 11 that automatically backs up your files to an external drive or network location. It provides versioning and easy restoration of previous file versions, ensuring data integrity.
With File History, users can set up regular Windows 11 data backups and customize settings such as backup frequency and retention policies. This feature is especially useful for users who need to recover previous versions of files or revert changes made to documents, providing an added layer of protection against accidental deletions or modifications.
Connect an external drive where you want to store your file history backup.
Step 1: Go to Settings by clicking on the Start menu and selecting the gear icon.
Step 2: In Settings, click on "System" and then "Storage."
Step 3: Scroll down and click on "Advanced storage settings."
Step 4: Under "More storage settings," find "Backup options" and click on it.
Step 5: Click on "Add a drive" and select the external drive you connected.
Step 6: Toggle "Automatically back up my files" to On.
Step 7: Once selected, File History will automatically start backing up your files.
Way 3. CBackup
CBackup is an advanced cloud backup solution that offers seamless integration with Windows 11. With its user-friendly interface and robust features, including automatic backups, file synchronization, and 256-bit AES Encryption, CBackup stands out as an excellent choice for comprehensive data protection.
CBackup allows users to securely backup their files to the cloud, ensuring they are safe from hardware failures, theft, or other disasters. Additionally, CBackup offers flexible storage plans and competitive pricing, making it suitable for everyone's use.
Step 1: Install and Sign Up: Download the CBackup client for Windows 11 and install it on your device. Then create a CBackup account or log in if you already have one.
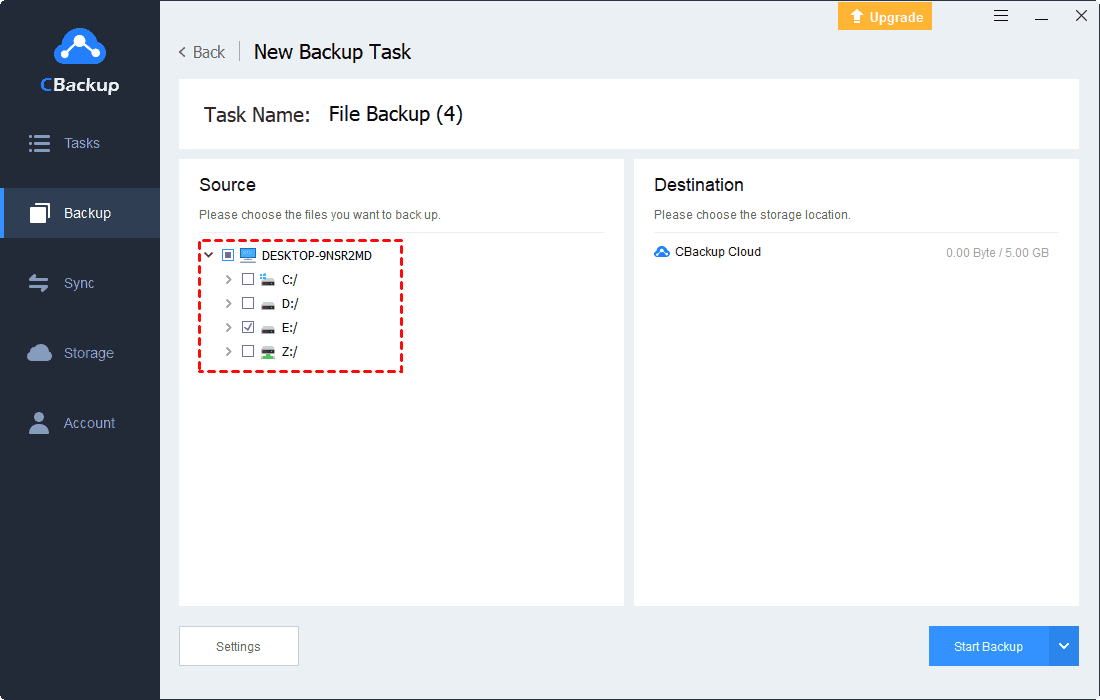
Step 2: Navigate to the "Backup" section and select "Backup PC to cloud."

Step 3: Choose to include all computer files or select specific folders as the backup source.
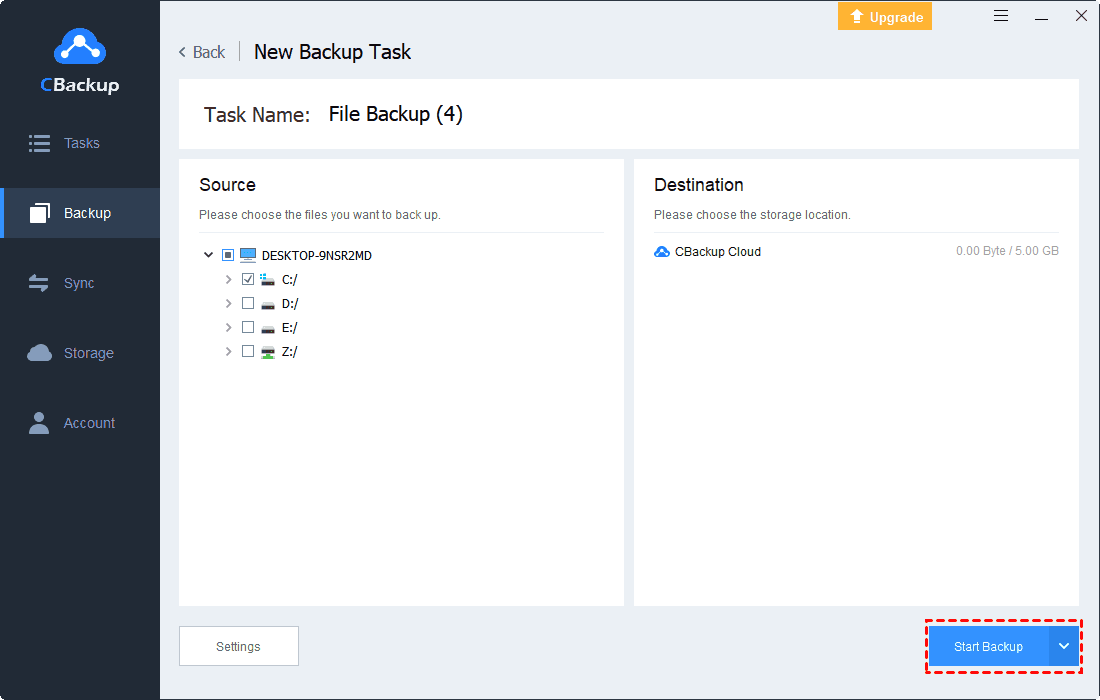
Step 4: Click on "Start Backup" to initiate the backup process.
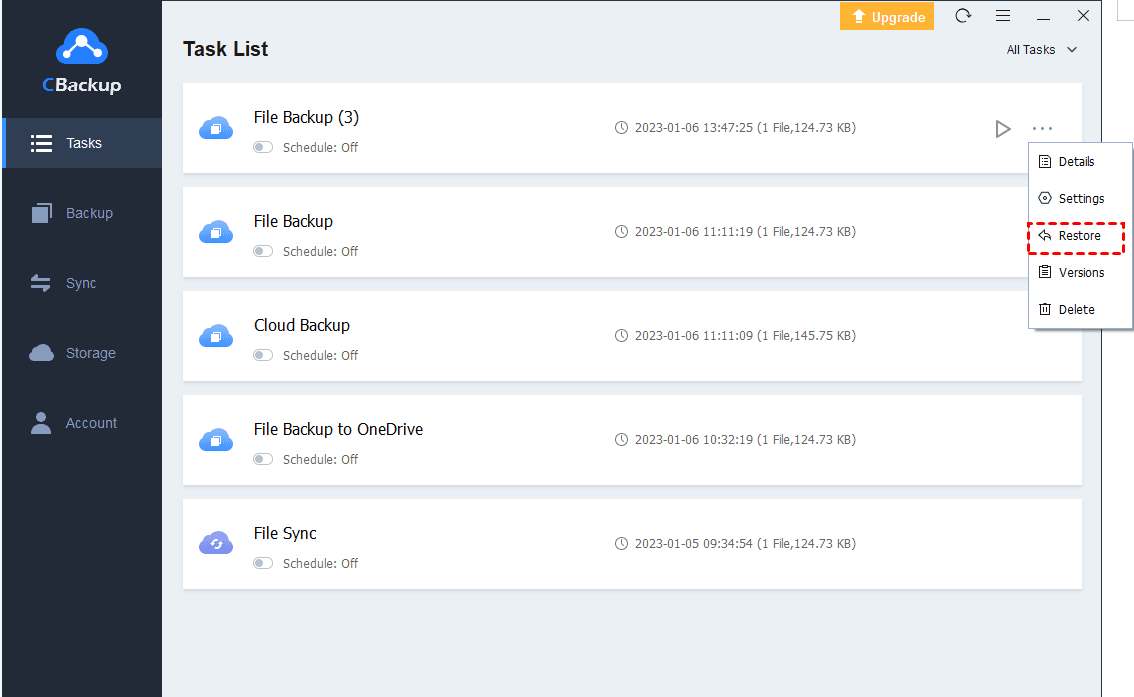
Restoring Data Backup in CBackup:
To restore backed-up data in CBackup, simply click on the three-dot button next to the backup task and select "Restore" to effortlessly complete the file restoration process.
Way 4. Google Drive
Google Drive provides a convenient cloud storage solution for Windows 11 users, offering generous storage space and easy file-sharing capabilities. While primarily designed for collaboration and productivity, Google Drive can also serve as a reliable Windows 11 file backup option for personal files.
With Google Drive, users can sync their files across devices and access them from anywhere with an internet connection. Google Drive also offers versioning and recovery options, allowing users to restore previous versions of files or recover deleted items with ease.
Step 1: Download and install Google Drive Backup and Sync from the Google Drive website.
Step 2: Sign in to your Google account or create one if you don't have one.
Step 3: Choose the folders you want to backup by clicking on "Choose Folder" during setup.
Step 4: Select the folders you want to sync with Google Drive.
Step 5: Choose whether to sync everything in the folders or only specific items.
Step 6: Click "Start" to begin syncing your files with Google Drive.
Way 5. Dropbox
Similar to Google Drive, Dropbox offers cloud storage with synchronization across devices. It provides file versioning and recovery options, making it suitable for personal and business use.
With Dropbox, users can easily back up their files to the cloud and access them from any device, ensuring their data is always accessible and secure. Additionally, Dropbox offers advanced collaboration features, making it a popular choice for teams and businesses looking to share and collaborate on files in real time.
Step 1: Download and install Dropbox from their official website.
Step 2: Sign in to your Dropbox account or create one if you don't have one.
Step 3: After installation, Dropbox will create a folder on your computer.
Step 4: Copy or move the files and folders you want to back up into the Dropbox folder.
Step 5: Dropbox will automatically sync these files to the cloud.
Step 6: You can also access your Dropbox files from any device by signing in to your Dropbox account.
Common Concerns about Windows 11 Data Backup
1. Security: With CBackup's 256-bit AES Encryption, your data is securely protected from unauthorized access.
2. Storage Space: CBackup offers flexible storage plans to accommodate your backup needs, ensuring you never run out of space. Moreover, the combined cloud feature of CBackup allows you to get unlimited cloud storage space.
3. Compatibility: CBackup is fully compatible with Windows 11, providing seamless integration and reliable backup performance.
Conclusion
In conclusion, backing up your files in Windows 11 is essential to safeguard your data against loss or corruption. While options like Backup and Restore, File History, Google Drive, and Dropbox offer viable solutions, CBackup, the best way to backup files on Windows 11, emerges as the best choice for comprehensive data protection.
With its advanced features, user-friendly interface, and unmatched reliability, CBackup provides peace of mind knowing your files are securely backed up in the cloud.

Secure & Free
